Create a scheduled email
- Availability
- Beta
- Last verified
- Last verified Jul 25, 2026
Use a scheduled email when customers should automatically receive a message at a set time relative to their booking or the event start — for example a reminder two days before the start time or a follow-up one week after booking.
Before you start
Decide:
- when the email should send, and whether the timing is relative to the event start time or the booking time
- whether it should go only to customers who signed up for specific subscriptions
- whether it may be sent without marketing consent
- the subject and body content for each language your shop uses
Create the scheduled email
- In the back office, open Comms > Scheduled Emails.
- Select Create.
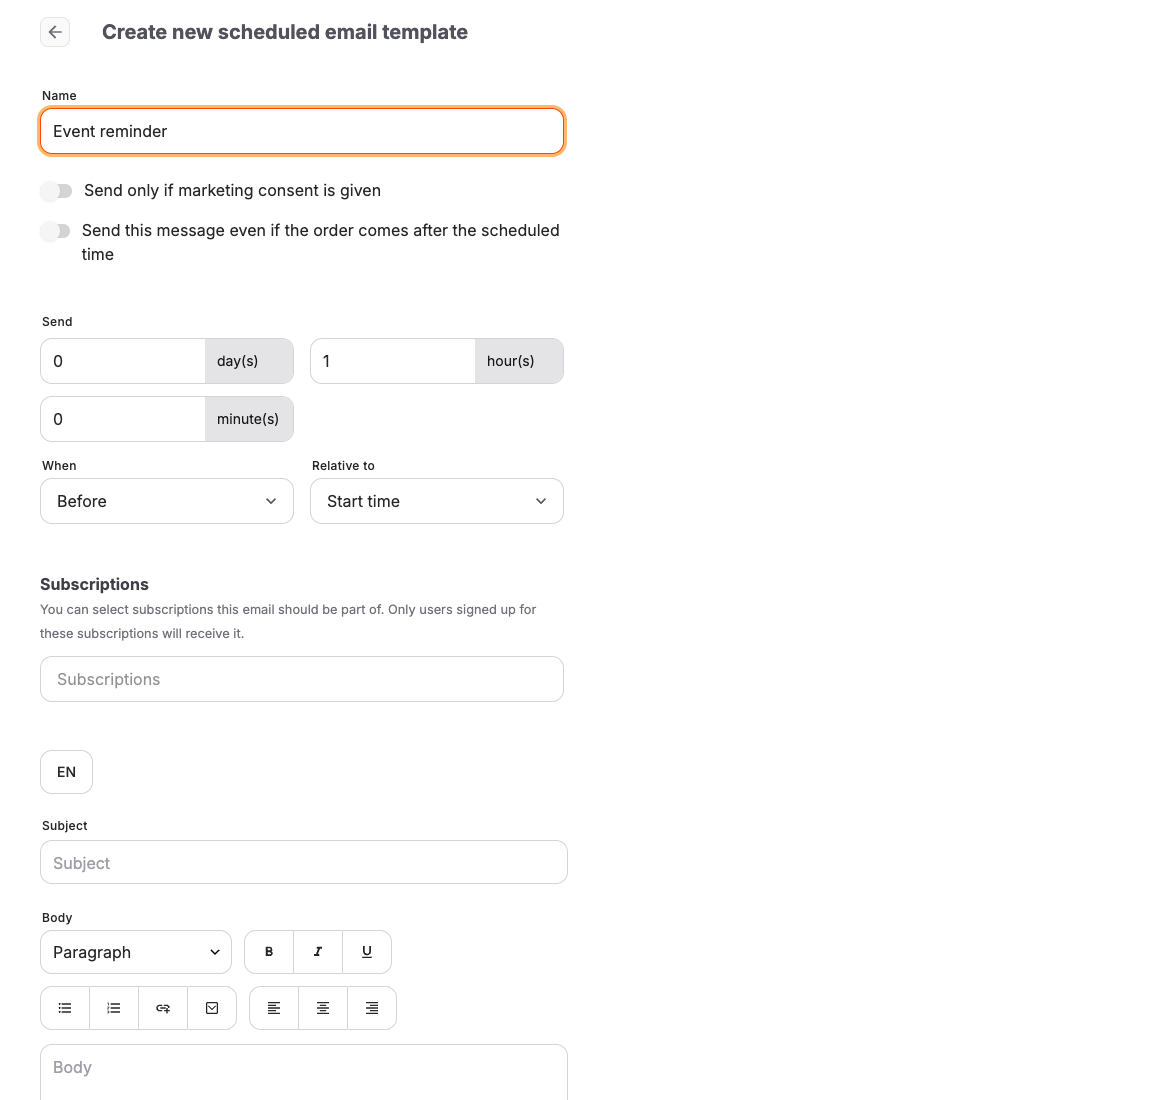
- Enter a Name. This name is internal; customers see only the subject and body.
- Set the timing: enter a duration next to Send, then select Before or After under When, and Start time or Booking time under Relative to. With a duration of zero, the option becomes Exactly at.
- Switch on Send only if marketing consent is given when the message is promotional rather than operational.
- Switch on Send this message even if the order comes after the scheduled time if late bookers should still receive the message after its send time has passed.
- Under Subscriptions, optionally select subscriptions. Only customers signed up for these subscriptions will receive the email.
- Enter the Subject and Body. Insert placeholders and text blocks from the suggestion list instead of typing them manually.
- Review the complete form, then select Create below the fields.
Assign it to your services
A scheduled email only sends for orders on the services it is assigned to:
- Open the event, event template, product, admission, or voucher that should trigger the email.
- Open the Customer communications tab.
- In the Scheduled emails section, select the scheduled emails to assign.
- Select Update communications.
A scheduled email is separate from the Information for the customer text on the same tab. That text appears inside order emails and does not send anything on its own. See Add information for the customer to emails and tickets.
Scheduled emails on events from an event template
Timing belongs to the scheduled email, not to the assignment. Changing Send, When, or Relative to changes the timing for every service the scheduled email is assigned to.
| Event | Which scheduled emails it uses |
|---|---|
| Start time generated from an event template | The template's scheduled emails. Assign or remove them on the event template; the change applies to the template's upcoming start times. |
| Standalone event created from an event template | A copy of the template's assignments made when the event was created. The event keeps the template's reminders and timing. Later changes to the template do not change the event, and the reverse. |
To check or change the scheduled emails of a standalone event:
- Open the event and its Customer communications tab.
- Review the scheduled emails listed under Scheduled emails.
- Remove a scheduled email that should not send for this event, or add a different one.
- Select Update communications.
To use different timing for one event, create a separate scheduled email with that timing, assign it to the event, and remove the template's scheduled email from the event.
Placeholders in scheduled emails
Scheduled emails and order emails, such as Order booked, offer different placeholders in the suggestion list:
| Placeholders | Order emails | Scheduled emails |
|---|---|---|
| Customer, such as name and form of address | Yes | Yes |
| Account, such as account name, email address, and address | Yes | No |
| Order, such as order number, order date, order items table, and ticket download page link | Yes | Yes |
| Order items block | Yes | Yes |
| Fields for each order item: Service name, Additional service information, and Booking and attendee details | Yes | No |
| The service the email was sent for: Name, Number, Location name, Address (formatted), and Additional service information | No | Yes |
| Tickets attached and Invoices attached conditions | Yes | No |
Scheduled emails offer the order items block, but its individual item fields are not in the suggestion list. To include service information in a scheduled email, use Additional service information for the service the email was sent for.
Neither email type has separate start date and time placeholders. The order items table shows the date and time of each ordered service. Scheduled emails are sent without ticket, invoice, or service attachments; use the ticket download page link when a reminder should give access to tickets.
Archive a scheduled email
Open an existing scheduled email and select Archive beside its title. Archiving moves it to the archived scheduled emails list and removes it from any events, event templates, or admissions it is assigned to. It stops sending from that point on. Open it from the archived list and select Restore beside its title to undo the action.
Expected result
Customers who book an assigned service — and who match the subscription and consent conditions — receive the email at the configured time, and each send appears in the order's History.
Troubleshooting
| Problem | What to check |
|---|---|
| Email never sends | Assignment on the service's Customer communications tab, archived state, and whether the send time passed. |
| Some customers are skipped | Selected Subscriptions, marketing consent on the customer profile, and the customer's email address. |
| Late bookings receive nothing | The Send this message even if the order comes after the scheduled time switch. |
| Timing option cannot be saved | Whether the service has a start time when Relative to is set to Start time. |
