First event setup checklist
Use this checklist when you are preparing the first event that customers or staff will sell through KORONA Event.
If the account itself is not configured yet, complete Set up a new KORONA Event account first. It covers language, time zone, users, integrations, legal texts, and payments before offer setup begins.
The checklist follows the first go-live path: create the event, add prices and capacity, choose sales channels, configure checkout policy, and prepare the online shop.
Before you start
Confirm these decisions before you create the event:
| Decision | What to prepare |
|---|---|
| Event basics | Customer-facing name, description, date, start time, end time, image, venue, and address. |
| Capacity | Total number of places, whether the event is exclusive, and whether resources also limit capacity. |
| Prices | Imported products, customer-facing categories such as adult or child, and quantity limits. |
| Sales endpoints | Whether defaults should remain available at all points of sale or need restrictions or reserved capacity. |
| Checkout details | Required customer fields, attendee questions, waiver requirements, and legal confirmations. |
| Payments | Payment provider, payment methods, payment-link expectations, and invoice handling. |
| Operations | Staff who need access to orders, attendees, tickets, reports, resources, and POS sales. |
You need back-office access that allows you to create events, edit prices, manage sales channels, configure the shop, and review orders.
1. Create the event
In the back office, open Services > Events, then select Create event.
On Create new event, enter the event name, description, date, Start time, End time, capacity, venue, and image. Use the same wording customers should see in the online shop, tickets, and confirmation email.
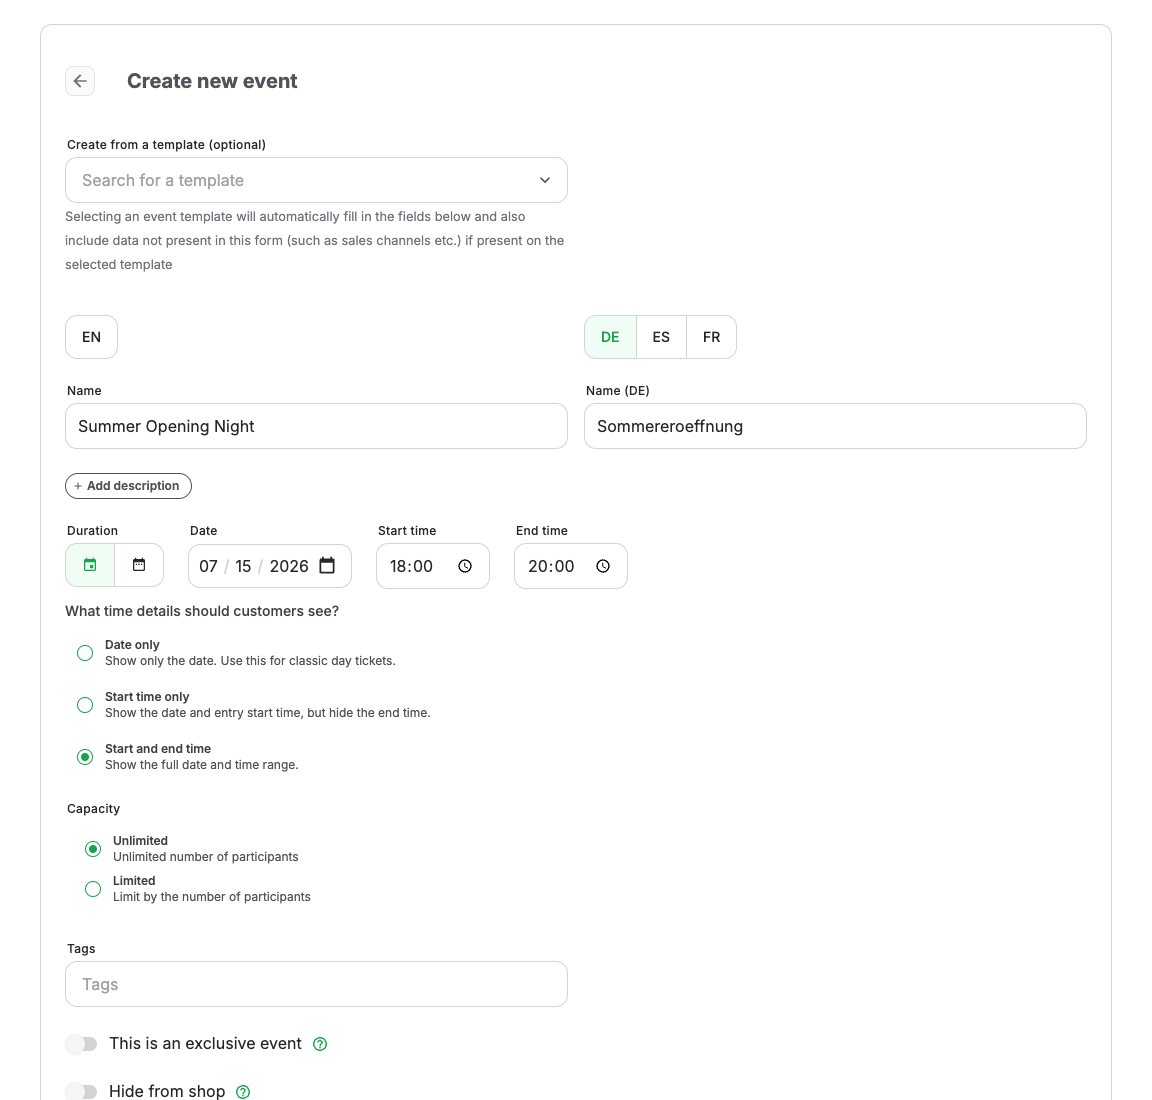
Check these setup points before you save:
| Field or state | Why it matters |
|---|---|
| Name | Appears in the shop, order, attendee list, tickets, reports, and POS. |
| What time details should customers see? | Controls whether customers see Date only, Start time only, or Start and end time. |
| Capacity | Controls the event-wide availability before sales channel or resource limits are applied. |
| This is an exclusive event | One booking blocks the whole event, no matter how many participants are booked. |
| Hide from shop | Keeps the event out of shop listings and search. Use it for tests or private direct-link flows. |
| Ticket is valid only for the exact duration of the event | Controls whether entry is limited to the event time or has an entry window. |
Select Create.
2. Add sellable prices
After the event is created, open the Prices tab and select Add pricing.
For each ticket type, choose the Price category, Product, Visible on the following sales channels, Min quantity, and Max quantity. Then select Update prices.
Use customer-friendly price category names. Names such as "Adult", "Child", "Reduced", and "Group" are easier for customers and cashiers than internal abbreviations.
3. Review sales defaults
New events are available to all configured points of sale and draw from the event's full remaining capacity by default. Keep that default for a normal launch. Open Sales channels only when you need to restrict a point of sale, reserve capacity, or set a sales window.
The online shop and back-office ordering flows use configured point-of-sale records. They are not separate abstract channel types; the shop has an assigned POS, and staff orders use the account's back-office or telephone POS.
For each rule, confirm:
| Setting | Use it when |
|---|---|
| Event capacity | The channel can use the event's full remaining capacity. |
| Limited and Capacity | You want to reserve only part of capacity for this channel, such as a POS allocation. |
| Unlimited | The channel should not limit sales by participant count. Use this only when the offer should not consume capacity through this rule. |
| Sales start and Sales end | Sales can open before the event and close before, at, or after the event starts, or remain open until the event ends. |
Select Update sales channels.
4. Add checkout information
If you need extra customer or attendee information, open the event's data collection or personalization setup and add only the questions your team actually needs.
Use Collect this information per to decide whether the question is asked once per booking or once per attendee. Turn on Must answer only for fields that must be complete before the order can continue.
If the event requires a waiver, configure Waiver signature for the intended booking or attendee scope. See Add a waiver to checkout.
5. Configure the online shop
Open Shops and select the shop that will sell the event. Review the Branding, Pages, Page Builder, Checkout, Calendar, Time Slots, Code snippets, and Theme tabs that apply to your launch.
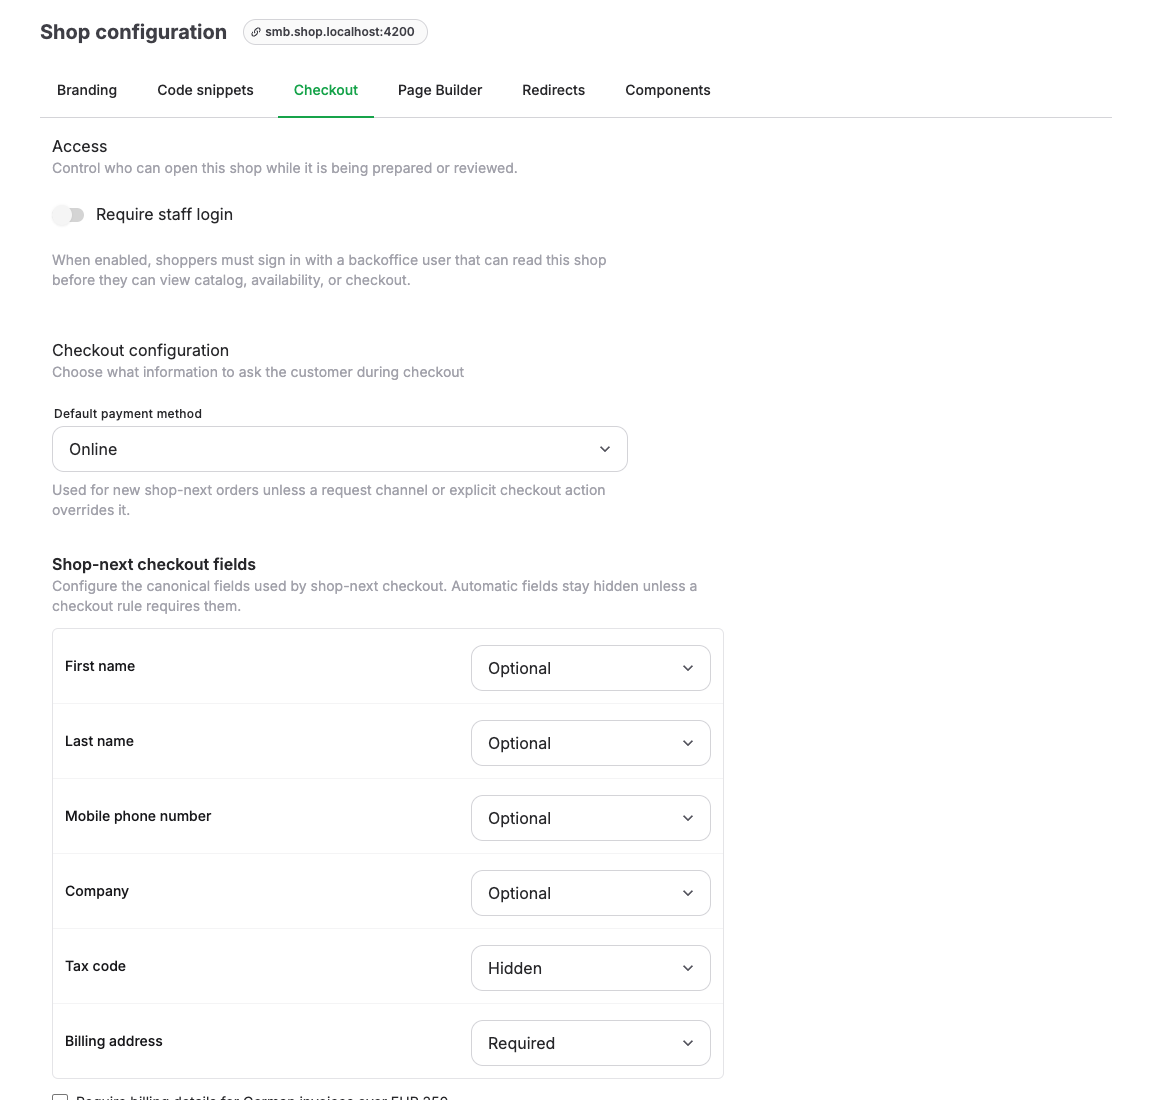
Before launch, confirm:
- the shop has the correct Domain name and Sales channel
- Shop pages are active for the offer types you sell
- the event appears in the intended offer list or page builder block
- Checkout configuration asks for the right customer fields
- required legal documents are available and linked from the shop
- payment methods are active and appropriate for the event
Expected result
Your first event has the intended customer-facing content, schedule, prices, capacity, sales channels, checkout policy, shop placement, payment methods, and staff ownership.
Check your work
The setup is ready for launch when all of these checks pass:
- the event is published only when it should be visible
- the Hide from shop setting is not accidentally turned on
- at least one active price is visible for each intended sales channel
- the event is assigned to the intended shop and points of sale
- capacity and resource limits match the operational limit
- checkout fields, waivers, and legal documents match your policy
- cashiers know the POS path and fallback process
Troubleshooting
For a missing offer, follow Troubleshoot an offer missing from the shop. For a POS sale, continue with Sell a ticket at the counter.
| Problem | What to check first |
|---|---|
| The event is missing from the online shop | Publishing state, Hide from shop, shop page, sales channel, sales period, active prices, inventory, and capacity. |
| The event appears but cannot be added to cart | Remaining capacity, Min quantity, Max quantity, resource limits, required included options, and checkout policy. |
| The shop asks for the wrong fields | Checkout configuration, event questions, attendee questions, waiver setup, and required legal documents. |
| A POS cannot sell the event | Point-of-sale assignment, sales period, active price, selected date, capacity, and resource limits. |
| A payment or confirmation step fails | Payment provider status, payment method availability, invoice state, payment-link state, and any customer-visible error text. |
| The order exists but tickets are missing | Payment state, order state, document generation, attendee records, and whether the order was canceled or auto-canceled. |
Related articles
- Set up a new KORONA Event account
- Create a sellable event
- Create an event template
- Configure your online shop
- Review the customer checkout before launch
- Sell a ticket at the counter
- Print tickets, receipts, and vouchers
- Run front-desk operations on event day
- Orders and invoices
- Troubleshoot availability and capacity
