Customize ticket PDF content
- Availability
- Beta
- Last verified
- Last verified Oct 6, 2026
Use the PDF template editor to control what appears on the PDFs KORONA Event generates. The same editor covers templates for tickets, invoice documents, delivery notes, and vouchers; this article uses a ticket template as the example.
Before you start
- Know which template type you are changing and which order or attendee you can use for a test preview.
- Have any logo, picture, or background image ready as a PNG or JPEG file of up to 5 MB. PDFs cannot show other image formats.
- Plan the change on a copy first: the KORONA Event-provided templates are marked with the System source, and duplicating one keeps the original intact. When you open a default template, the editor reminds you of this and offers Duplicate template, which opens the copy right away.
Find and open the template
- In the back office, open Comms > PDF Templates.
- The list shows Title, Type, Default, and Boxes for each template. Use the Filter by field to filter by type, Default / Not default, or Source (System / Custom).
- To work on a copy, select Duplicate on the template, then continue in the duplicate.
- Select Open editor.
Save and reuse a filtered list
Save a view when you regularly need the same group of templates:
- Select Filter by, then apply one or more filters:
- Type for the document type.
- Default or Not default for the template's default status.
- Source > System or Custom for KORONA Event-provided or account-created templates.
- Select Create new view.
- In Create View, enter a Name and select Save.
- Select the saved view above the table whenever you want to apply those filters again.
To change an existing saved view, select it, adjust the filters, then select Save > Save to this view. Use Create new view instead when you want to keep the original view.
Find your way around the editor
Use Design to arrange boxes on the page and PDF preview to see the generated document. The editor keeps your changes as a draft until you select Save changes.
The editor shows the page in the middle, with the tools around it:
| Area | What you do there |
|---|---|
| Top bar | See the template title and type, whether it is the default, and whether you have unsaved changes. Undo, redo, save, choose the Content language to edit, and choose the record for the preview. |
| Left panel | Add box buttons, and the Boxes list with every box on the page. |
| Page | Switch between Design and PDF preview. In Design, the page shows each box with its content; select a box to edit it and move or resize it directly (see below). Select an empty area of the page to show the template settings. |
| Right panel | The Box tab edits the selected box. The Template tab edits the template title, default status, page size, and background. |
On narrower screens the boxes list moves below the page; on small screens the settings appear below it as well.
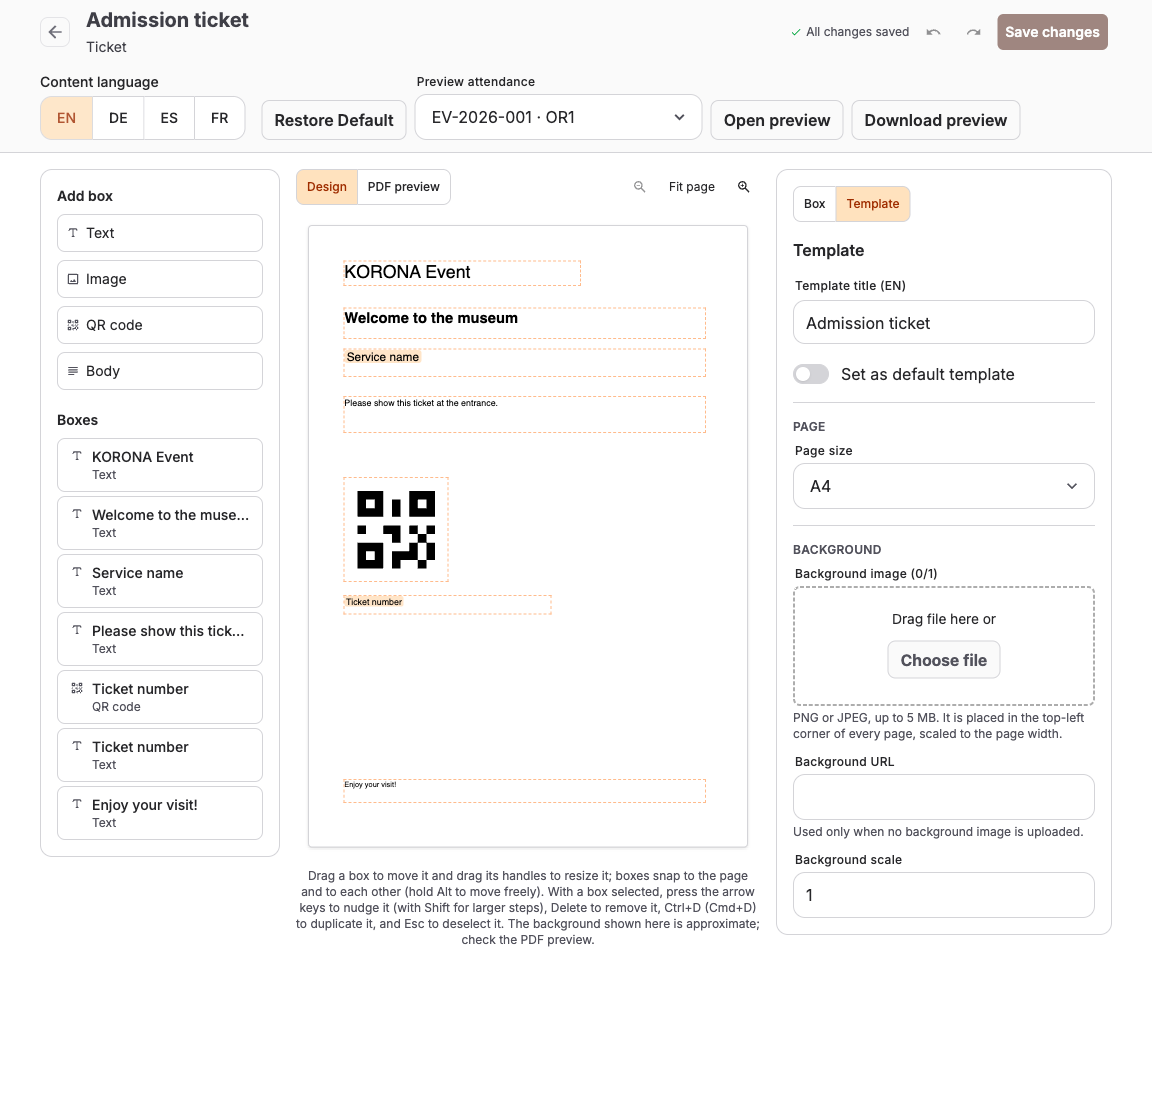
If your account has more than one content language, use Content language to switch the content and title fields to that language. The language also controls the generated preview. Text left empty in another language uses the text of your account's main language.
Edit template settings
Select the Template tab in the right panel (or an empty area of the page):
- Template title names the template in the list. Switch the Content language to translate it.
- Set as default template makes this template the one used when documents of its type are generated — for a customer-download ticket template, every newly generated email or download ticket PDF. Physical cards use a separate default. Each type always has exactly one default template, so the switch is locked on the current default; to use another template, open that template and set it as the default.
- Page size sets the paper format: A4, US Letter, or Custom. For Custom, enter Custom page width and Custom page height in points (1 pt = 0.35 mm).
- Background image places an image behind the boxes, such as letterhead. It is anchored at the top-left corner and scaled to the page width; it does not stretch to fill the page height. See Add images.
Configure physical membership cards
Physical cards use their own ticket templates. Customer email attachments and downloads continue to use the customer-download default.
- Duplicate a ticket template in Comms > PDF Templates and open the copy.
- Set PDF purpose to Physical card and Page size to Custom. Enter positive Custom page width and Custom page height in points (72 points = 1 inch). For example, a landscape card measuring 85.6 × 54 mm is approximately 242.65 × 153.07 points. Width and height determine the orientation.
- Reposition the boxes for the smaller page. Use the ticket-holder name/photo placeholders for the person who owns the card and the activation ticket-number placeholder for the existing credential number. Keep the QR code large enough, fully inside the page, with clear space around it. The card retains the existing membership number.
- Select Tenant physical-card default if this layout should apply to products without their own card assignment, then Save changes.
- Open the product under Services > Products. In its basic settings, select Physical-card PDF template and save. Leave the field empty to use the tenant card default. The saved effective selection appears as Product assignment or Tenant default.
For bundles, assign the layout to each holder's actual product, including child products, rather than only to the bundle. Products in the same order can use different layouts. A default or assigned template cannot change purpose: duplicate it first.
Saved changes to the Tenant physical-card default apply immediately to newly generated cards for products using that default. The editor shows a notice with Duplicate template so you can work on a copy before changing the live layout. Products with their own card assignment continue to use their assigned template.
Holder information and preview
Card preparation requires the actual holder's mapped First name and Last name attendee fields. A template that includes a holder-photo placeholder also requires the mapped ID photo, even if the image box has a Show only when placeholder has a value condition. Missing names are never filled from the purchaser. Complete the holder's attendee information before opening a card preview. Group credentials and ancillary tickets without their own holder attendance cannot produce personalized cards.
In the top bar, select the holder under Preview attendance, then switch to PDF preview. Card preview requires permission to read attendees and PDF templates. Choosing a template explicitly for preparation takes priority over a product assignment and the tenant default, but it must still be a compatible physical-card template in the same account.
Card pages and printer media
The editor does not assign separate front and back designs. Design a single-page front for a single-sided card. If the template generates multiple pages, they stay in their generated order; they are not automatically paired, reversed, or converted into duplex cards. Check every preview page before using such a layout.
Template assignment does not select a printer or establish media compatibility. Use the intended card stock and printer settings, print at actual size without scaling, and confirm that the printed barcode scans on the intended reader before releasing the layout. Do not put printer addresses in product settings.
If no compatible card template is configured, select a physical-card ticket template with positive custom dimensions or set the tenant card default. Card output never falls back to the A4 customer-download template.
Work with boxes
All visible content on the PDF lives in boxes.
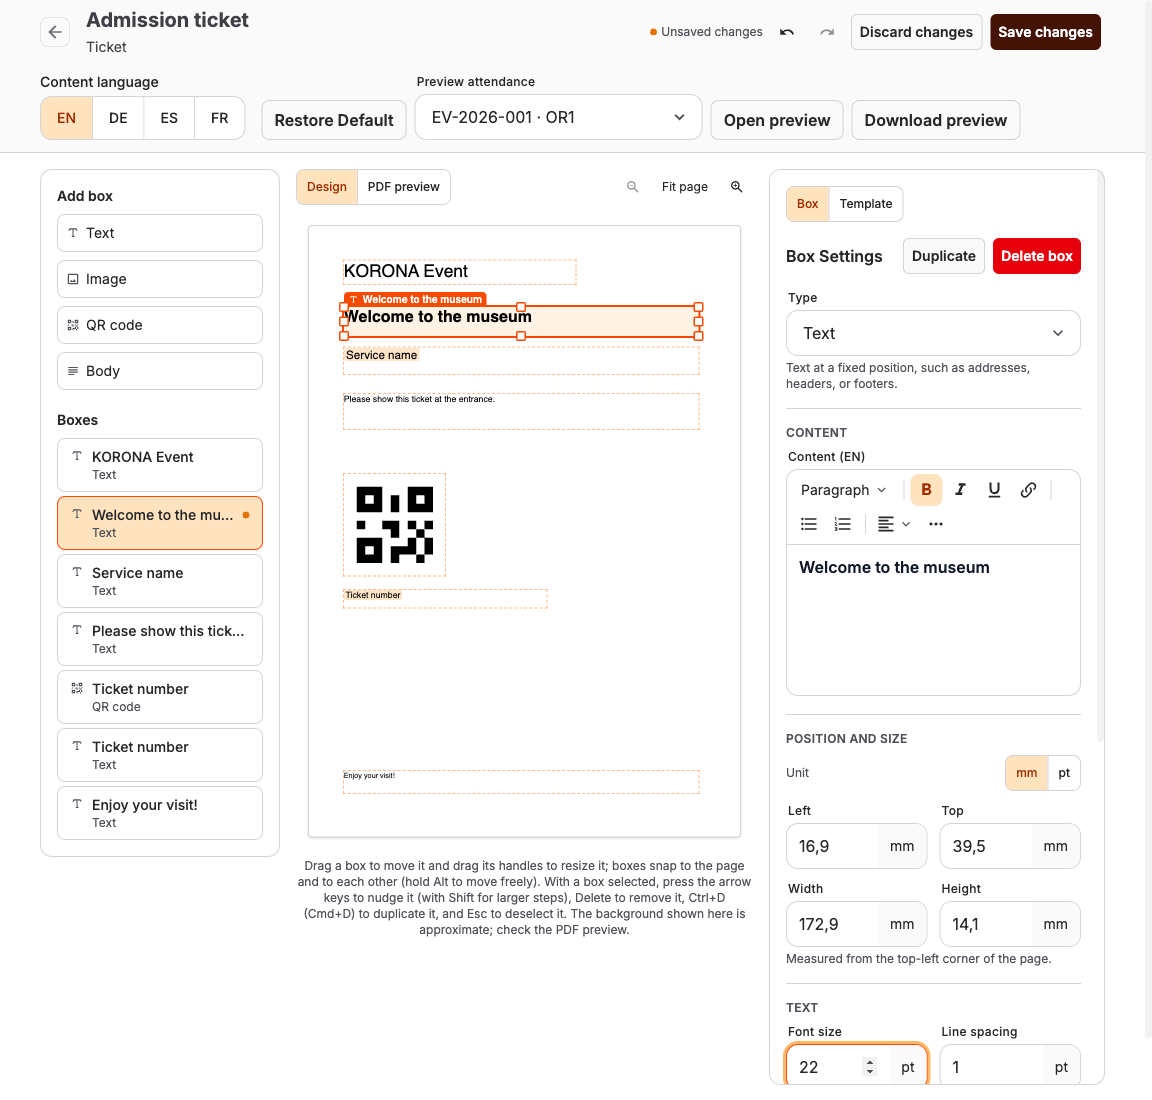
- Select a box on the page or in the Boxes list. Each box is listed with the start of its content and its type, so you can tell boxes apart. The selected box has resize handles on the page, and its settings appear in the right panel. The Box tab opens.
- To add a box, select one of the Add box buttons. The new box starts with sample content in a free spot near the top of the page:
| Box type | Use it for |
|---|---|
| Text | Text at a fixed position, such as addresses, headers, or footers. |
| Body | Flowing main content, such as item tables. It continues on a new page when it runs out of space. A template has one body. |
| Image | A logo or picture: an uploaded image, an image URL, or a placeholder. New image boxes show your account logo. |
| QR code | A QR code generated from the content. New QR codes use the ticket, voucher, invoice, or delivery note number. |
- Under Content, set the box content for the selected Content language. Enter
@in the content editor to open the suggestion list, then select placeholders and text blocks so order, attendee, and event data fills in automatically. For an event ticket created from a sub-product, such as a family package, use Event name, Event start, and Event duration to show the parent event details. - Under Position and size, set Left, Top, Width, and Height, measured from the top-left corner of the page. Choose the Unit: mm or pt (1 pt = 0.35 mm); the editor remembers your choice in this browser. A QR code is always square, so it has a single Size.
- Style the box. The editor shows only the settings that apply to the box type:
- Text (text and body boxes): Font size, Line spacing, Horizontal alignment, Vertical alignment, and Text color. QR codes have QR code color here.
- Spacing and border (text boxes): Padding and Draw border. Turn on Draw border to choose the Border color.
- Body boxes have Body start on first page, which sets where the body starts on the first page, measured from the top edge. Later pages start at the top of the box.
Font size, line spacing, and padding use points even when Unit is set to mm for position and size.
- Under Visibility, use Repeat on every page for headers or footers. Under Show only when placeholder has a value, choose a placeholder, such as the attendee's name, to leave the box out of the PDF when that placeholder has no value. Leave it on Always show to always print the box.
- To copy a box, select Duplicate; the copy appears slightly below and to the right. A body box cannot be duplicated because a template has only one body. To remove a box, select Delete box.
Move and resize boxes on the page
- Drag a box to move it. Drag one of the handles around the selected box to resize it; QR codes resize from their corners and stay square.
- While you drag, boxes snap to the page edges, the page centre, and the edges and centres of other boxes, and a line shows what they line up with. Hold Alt (Option on a Mac) to place a box freely.
- With a box selected on the page, press the arrow keys to move it by 1 pt, or with Shift by 10 pt. Press Delete to remove it, Ctrl+D (Cmd+D on a Mac) to duplicate it, and Esc to deselect it.
- Use the zoom buttons above the page to enlarge it for precise work, and Fit page to see the whole page again.
The page shows the content of each box with its font size, colour, and alignment, and placeholders as highlighted names. This is an approximation — always check the result in the PDF preview.
Add images
Upload images directly in the editor. Uploads must be PNG or JPEG files of up to 5 MB.
Page background
- Select the Template tab.
- Under Background, drag an image onto Background image or select Choose file.
- The editor scales the image to the width of the page. It is placed in the top-left corner of every page. To change its size, edit Background scale; select Fit to page width to fit it again.
To remove the background, remove the image under Background image. Without an uploaded image, you can enter a Background URL instead; an uploaded image takes its place.
For a sharp result, use an image with the page's proportions, for example 1240 × 1754 pixels for A4.
Images in boxes
- Add an Image box, or select an existing one.
- Under Content, drag an image onto Image or select Choose file. The box height changes to match the image's proportions.
- Move and resize the box as needed. The image is scaled to fit inside the box and keeps its proportions.
The uploaded image is used in every Content language. To show a different image per document instead, such as the logo of the account, remove the uploaded image and enter a placeholder or image URL under Content.
Uploaded images are saved together with your other changes when you select Save changes.
Save or undo your changes
Changes to boxes and template settings — including moving, resizing, adding, and deleting boxes — are kept in the editor until you save them. Until then, newly generated PDFs keep using the saved version.
- The top bar shows Unsaved changes while something is not saved, and boxes with unsaved changes are marked in the Boxes list.
- Select Undo or Redo, or press Ctrl+Z / Ctrl+Shift+Z (Cmd on a Mac) outside a text field, to step through your changes.
- Select Save changes, or press Ctrl+S (Cmd+S), to save everything at once. If a box cannot be saved, for example because its content is empty, a message names the box and the editor selects it.
- Select Discard changes to return to the saved version. You can undo this as well.
- If you leave the editor with unsaved changes, you are asked whether you want to leave.
If you turned on Set as default template, the editor asks you to confirm before saving, because every newly generated document of this type uses the template as soon as it is saved.
Preview the result
Check the real PDF while you work, including changes you have not saved yet. You can preview a copy before making it the default.
- In the top bar, choose the record to preview. For an invoice template, an invoice is preselected under Preview invoice; select another invoice to preview it instead. For a ticket or voucher template, select Preview attendance, enter all or part of a ticket number or order number, then select the matching attendance. Delivery note templates always use the most recent delivery note.
- Above the page, switch from Design to PDF preview. The generated PDF appears in place of the page and updates shortly after each change. Select Refresh preview to generate it again.
- Check every placeholder, the QR code, and the page layout. To view the PDF in a separate tab or save it, select Open preview or Download preview.
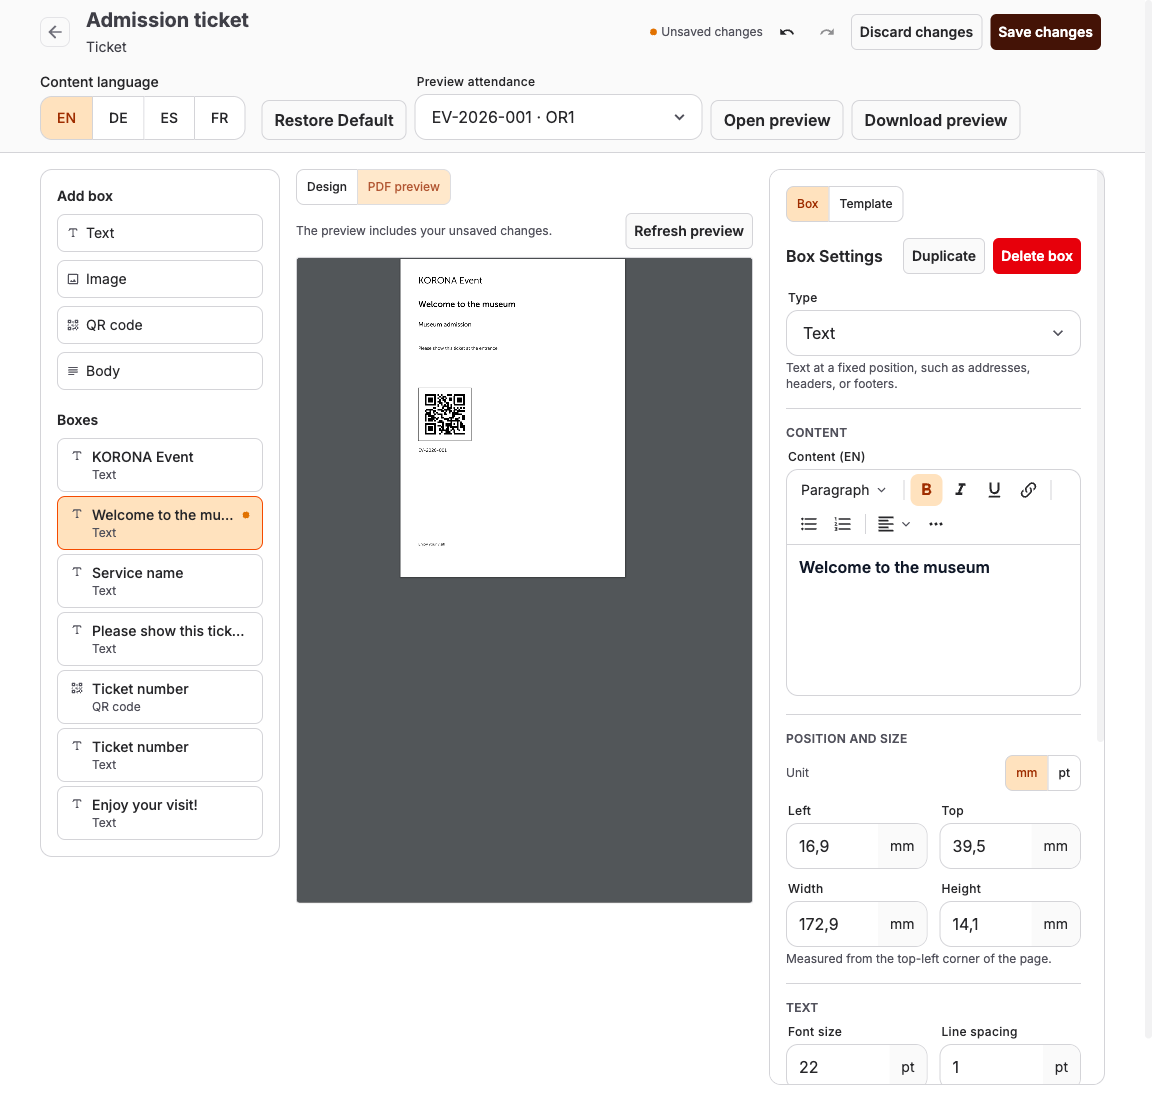
If the preview cannot be generated, it says why — for example, that there is no attendee to preview a ticket template with yet, or which box needs content.
Expected result
After you save a customer-download ticket template and set it as the default, newly generated email and download ticket PDFs use your layout, with placeholders filled from the ticket and order data. Physical cards use the assigned product template or the physical-card default.
Troubleshooting
| Problem | What to check |
|---|---|
| Change does not appear on PDFs | Whether the edited template is the Default for its type, and whether your changes were saved. |
| Placeholder prints as raw text | Whether it was inserted from the suggestion list and is supported for this template type. |
| Box missing from the output | The Show only when placeholder has a value setting and whether that placeholder has a value for the test record. |
| Layout differs from the editor | The PDF preview — the background shown in Design is approximate. |
| Image upload is rejected | Whether the file is a PNG or JPEG of up to 5 MB. Convert other formats, such as SVG or WebP, before uploading. |
Restore the built-in boxes
For an A4 or US Letter customer-download template, select Restore Default in the top bar and confirm. This replaces every box, including its content, position, formatting, and translations, with the built-in layout for the current template type and page size. The template title, background, and default assignment stay unchanged.
Review the result in PDF preview, then select Save changes to use the restored layout for future PDFs. Use Undo to reverse the restoration, or Discard changes to return to the last saved version. Restoration is unavailable for custom page sizes and physical cards because they have no built-in layout.
