Set up the Lynck back office
- Last verified
- Last verified Sep 15, 2026
Use this guide to connect Lynck (CrefoPay) to KORONA Event and configure the URLs that return customers to your shop and deliver payment updates. You need to save settings in both KORONA Event and the Lynck merchant portal.
Before you start
- Have administrator access to payment settings in KORONA Event and access to the correct shop in Lynck.
- Decide whether you are setting up test or live payments. Use the Lynck sandbox for test credentials and your Lynck production account for live credentials.
- Have the HTTPS address of your online shop and the account-specific API address shown in KORONA Event payment settings.
- Confirm with Lynck which payment methods are approved for your shop.
1. Connect the credentials
- In Lynck, open Settings → Shop Information → API Credentials. Confirm that you have selected the intended shop.
- In KORONA Event, open Administration → Payments → Lynck (CrefoPay).
- Enter the matching credentials in Test Credentials or Live Credentials:
| Lynck field | KORONA Event field |
|---|---|
| Merchant ID | Lynck Merchant ID |
| Shop ID | Store ID |
| Public Key | Shop Public Key |
| Private Key | Private Key |
The private key is a secret. Copy it only into the corresponding KORONA Event credential field; do not include it in screenshots or support messages. Your merchant-portal login password is not the private key.
- Save the KORONA Event settings. Keep Live Mode off while using sandbox credentials.
Google Pay also needs the Google Pay Console Merchant ID in KORONA Event. This is a different identifier from the Lynck Merchant ID. Wallet availability also depends on provider approval, domain setup, and the customer's device. See the payment-method reference in the payment setup overview.
2. Configure the shop URLs
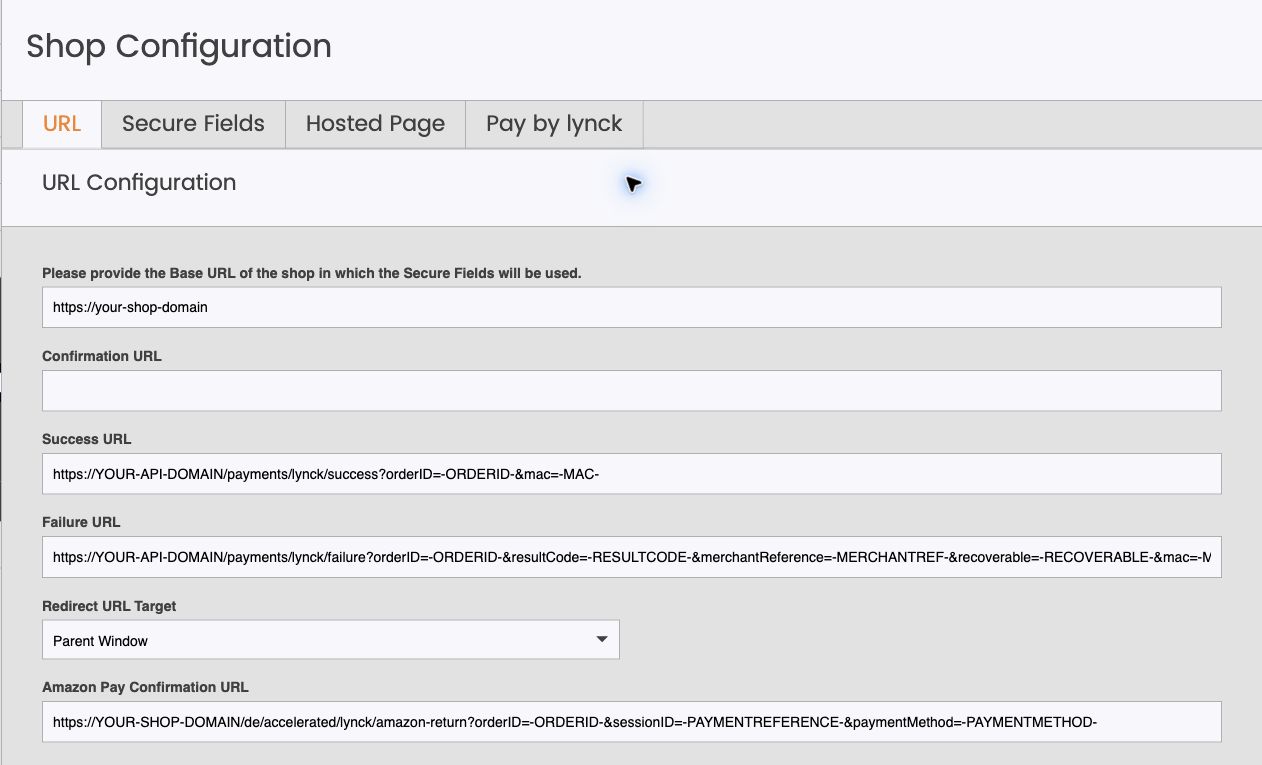
In KORONA Event, find Lynck Backoffice Configuration on the Lynck payment settings page. In the Lynck portal, open Settings → Shop Configuration → URL and select Change under URL Configuration.
| Lynck field | Value to enter |
|---|---|
| Base URL of the shop in which the Secure Fields will be used | The Base URL from KORONA Event: your HTTPS online-shop address. |
| Confirmation URL | Leave empty for the KORONA Event SecureFields checkout. This generic field belongs to the Hosted Page flow. |
| Success URL | The Success URL from KORONA Event, pointing to your account's API address. |
| Failure URL | The complete Failure URL, including all placeholders shown below. |
| Redirect URL Target | Parent Window. |
| Amazon Pay Confirmation URL | Only needed for Amazon Pay Express. Copy the separate Amazon Pay Confirmation URL from KORONA Event; this points to the online shop. |
KORONA Event uses SecureFields in its own checkout. You do not need to configure a Lynck Hosted Page for this setup. The separate Amazon Pay field is not the generic Confirmation URL.
Return URL templates
These templates explain the values to copy. Replace YOUR-API-DOMAIN with the account-specific API hostname from your KORONA Event settings. Do not use your shop hostname or back-office hostname in its place.
Success URL:
https://YOUR-API-DOMAIN/payments/lynck/success?orderID=-ORDERID-&mac=-MAC-Failure URL:
https://YOUR-API-DOMAIN/payments/lynck/failure?orderID=-ORDERID-&resultCode=-RESULTCODE-&merchantReference=-MERCHANTREF-&recoverable=-RECOVERABLE-&mac=-MAC-Keep the query parameter names, capital letters, hyphens, and placeholders exactly as shown. Lynck fills them in when returning the customer. Do not replace them with an actual order number, a key, or a manually calculated value.
merchantReference identifies the payment attempt so a customer can recover safely after another failed authentication. recoverable passes Lynck's recovery indication. mac authenticates the callback. All three must remain in the failure template.
For Amazon Pay Confirmation URL, use the value copied from KORONA Event. Its structure is:
https://YOUR-SHOP-DOMAIN/de/accelerated/lynck/amazon-return?orderID=-ORDERID-&sessionID=-PAYMENTREFERENCE-&paymentMethod=-PAYMENTMETHOD-Here YOUR-SHOP-DOMAIN is the online shop, and de is an example shop language. Preserve the language segment in the URL supplied by your KORONA Event settings.
Select Save in Lynck after entering your values.
3. Configure status notifications
Status notifications allow Lynck to send payment updates even when the customer closes the browser. The return URLs above do not replace this setup.
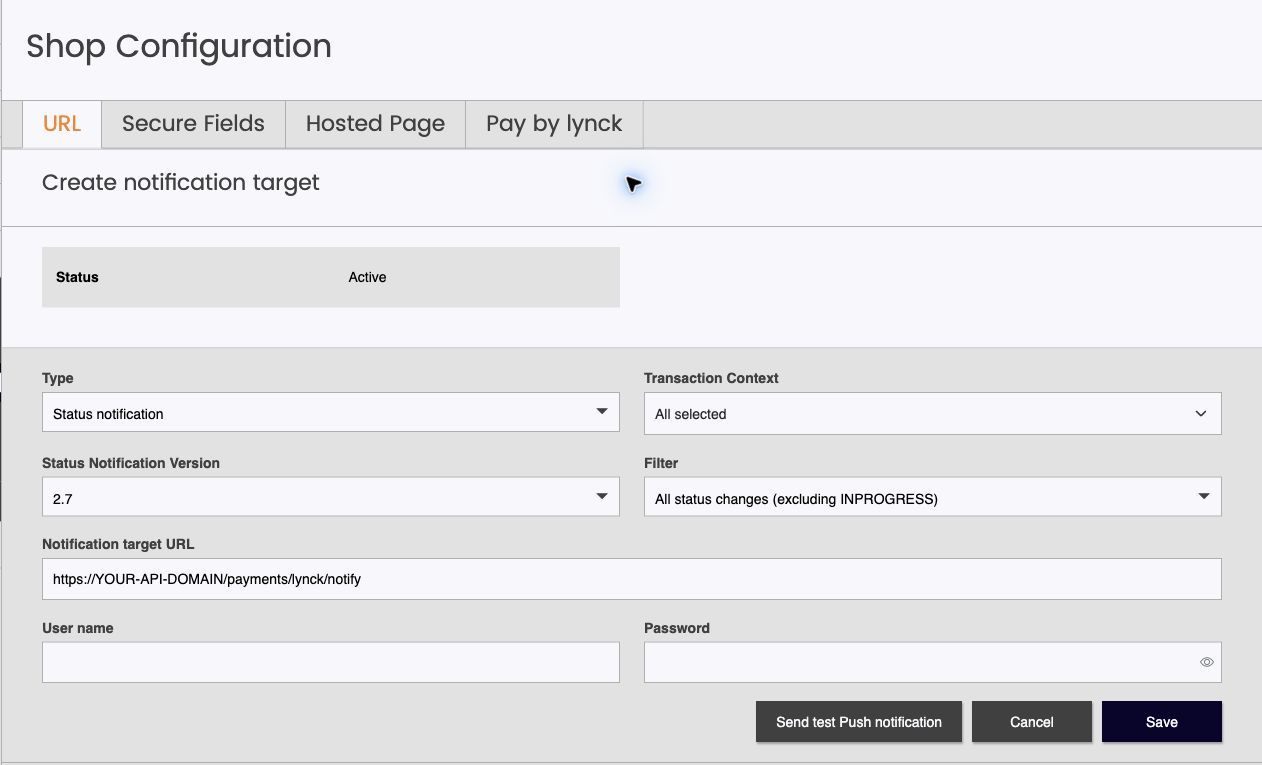
On Settings → Shop Configuration → URL, find System Notifications. If a notification target already exists for your KORONA Event account, open it and update that entry. Otherwise select Add. Avoid creating duplicate targets for the same account and environment.
| Field | Value |
|---|---|
| Status | Active |
| Type | Status notification |
| Transaction Context | Select all (All selected). |
| Status Notification Version | 2.7 |
| Filter | All status changes (excluding INPROGRESS) |
| Notification target URL | The Notification URL from KORONA Event, shown below. |
| User name | Leave empty. |
| Password | Leave empty. |
https://YOUR-API-DOMAIN/payments/lynck/notifyUse your account's API hostname. Do not add the browser-return query parameters to this URL. Authentication uses Lynck's MAC; do not enter your Lynck login credentials in User name or Password.
Select Save. The notification target should appear as Active in the list.
4. Set up your domain for Apple Pay
If you offer Apple Pay, configure the domain where customers actually pay. The API domain used for callbacks is not the Apple Pay shop domain.
Standard KORONA Event shop domain
In the back office's domain settings, select Lynck in the Apple Pay file dropdown for the standard shop domain. KORONA Event serves the bundled Lynck domain association file for this selection; you do not need to download and upload that file yourself.
Selecting Lynck makes the verification file available; it does not register the domain with Lynck. Complete these checks for the standard domain too:
- Open
https://YOUR-SHOP-DOMAIN/.well-known/apple-developer-merchantid-domain-association, replacing the placeholder with your standard shop hostname, and confirm that the file is reachable. - In the Lynck merchant area, open Settings → Apple Pay → Web, Hosted Pages & Subscriptions and check that the exact shop hostname is registered for the intended account.
- If it is not registered, enter the hostname and select Register. Confirm successful registration before testing Apple Pay.
Your own custom shop domain
- In the Lynck merchant area, start Apple Pay domain registration for your exact custom shop hostname. Use the intended sandbox or live account.
- Download the domain association file provided by Lynck for this setup.
- In the KORONA Event back office, open the settings for that same domain, choose Custom upload as the Apple Pay file source, and upload the downloaded file. Save the file without editing its contents.
- Confirm that the file is publicly reachable at
https://YOUR-SHOP-DOMAIN/.well-known/apple-developer-merchantid-domain-association. Replace the domain placeholder with your own shop hostname. - Complete the registration or verification in Lynck and confirm that the domain is registered successfully before testing Apple Pay.
Uploading a file and completing Lynck's registration are separate steps. Repeat the domain setup when you change the hostname; do not copy another shop's file.
The beta back office groups domain verification under Administration → Payments → Wallet domain setup. For file upload details, see Troubleshoot wallet payments. If the required upload control is unavailable, contact KORONA Event support to complete the custom-domain setup.
5. Prepare payments for launch
Check the approved methods under Lynck's Settings → Payment Method Configuration, then enable the intended online payment methods in KORONA Event. Keep automatic capture aligned with your agreed payment process; do not change capture behavior just to complete URL setup.
Use your test shop and Lynck sandbox before switching to live payments. Complete a successful test payment and a canceled authentication followed by a retry. Follow Review the customer checkout before launch for the wider checkout preparation.
For launch, select the corresponding production shop in Lynck, configure its URLs and notification target, and save the matching Live Credentials in KORONA Event. Enable Live Mode only when the live setup and provider approval are complete. Saving sandbox settings does not configure your production shop.
If setup does not work
| Symptom | Safe next step |
|---|---|
| The customer returns to the wrong website | Correct the shop/API addresses in the selected Lynck shop and ensure you are editing the intended environment. |
| A customer cannot retry after failed authentication | Check that the saved Failure URL contains the complete placeholders above, including merchantReference, recoverable, and mac. |
| Payment updates do not arrive after the browser is closed | Check that the status notification target is active and points to your account's API Notification URL. |
| You cannot access or edit the required Lynck settings | Ask your Lynck account administrator for access to the correct shop. |
If the configuration is complete but payments still do not work, contact KORONA Event support. Do not repeatedly submit a payment whose outcome is still pending.
