Configure checkout holds and unpaid order deadlines
- Availability
- Beta
- Last verified
- Last verified Aug 6, 2026
Use checkout holds when capacity should be held only while a customer is actively building a cart, completing checkout, or retrying an online payment. Use reservation deadlines when an order has already been reserved or left unpaid and staff need a follow-up deadline.
Before you start
Decide:
- how long a cart should hold capacity in the online shop, POS, self-checkout, and back office
- whether events that start soon need a shorter customer checkout timer
- the minimum time customers should get when retrying an online payment
- whether a hold must end before the event starts
- which reserved or unpaid order states should keep capacity after checkout
- what customer follow-up process follows an expired reservation deadline
New accounts include checkout-hold defaults for the standard order channels: the online shop uses a shorter Time to start policy for near-term events, POS uses a shorter fixed hold, self-checkout uses a medium fixed hold, and back-office orders use a longer fixed hold. Older accounts that do not yet have checkout-hold policies configured keep their existing auto-cancel behavior until a policy is saved.
Understand checkout holds
A checkout hold is the temporary capacity hold behind an active cart or unpaid checkout attempt. When a hold is active, the online shop shows a Time left countdown during checkout and eligible payment steps. If the timer reaches zero, KORONA Event releases the tickets and sends the customer back to the cart with an expiry message.
Checkout holds can be configured at several levels:
| Level | Where to set it | When to use it |
|---|---|---|
| Account | Admin > Account > Reservations and checkout holds | Set the fallback for the account. |
| Order channel | Settings > Order channels | Give the online shop, POS, self-checkout, or back-office flow a different default. |
| Offer | Services > Events, Event templates, or Admissions | Override the channel default for one offer, such as a high-demand event or timed admission. |
For an event, an explicit event hold takes priority over its event template's hold. If neither has an override, the order-channel policy applies, followed by the account policy. Event templates and admissions use their own override before the channel and account fallback. A checkout hold is inherited as a whole policy; its individual duration fields are not combined with another level.
To make an event follow its template again, turn off Override checkout hold on the event. To use the channel default, also remove the template override. Changing a shared template or channel can affect other offers that inherit it.
If a cart contains more than one dated item, KORONA Event uses the checkout hold that expires first. This prevents one long-running item from keeping near-term tickets blocked.
Choose a checkout-hold mode
Use Fixed when every eligible checkout should get the same amount of time.
Use Time to start when customers should get less time for events that start soon and more time for events farther in the future. Each rule has two parts:
| Field | What it controls |
|---|---|
| Event starts within | The event-start window that triggers the rule. |
| Hold for | The checkout time customers get when the selected event starts inside that window. |
| Default hold | The normal hold when no Time to start rule matches. |
| Minimum hold | The minimum duration before any event-start buffer is applied. |
| Minimum payment retry hold | The shortest hold used when an online payment attempt can still be retried. If the resolved checkout hold is longer, KORONA Event keeps the longer hold. |
| Release held capacity before event start | A buffer that releases held capacity before the event begins, even when the normal checkout timer would run longer. |
Duration fields use separate Hour(s) and Minute(s) inputs. For a hold longer than one day, enter the total number of hours, such as 48 hours for two days. Leave unused units at zero.
Keep Time to start rules increasing as the event moves farther away. For example, a shop policy might give customers 5 minutes when an event starts within 1 hour, 10 minutes when it starts within 6 hours, 15 minutes when it starts within 24 hours, and 30 minutes otherwise.
Cart changes can restart the checkout-hold timer; merely waiting does not. A retryable initial online payment can receive a refreshed hold. An online payment already in progress is excluded when KORONA Event calculates the checkout-hold deadline. Do not treat a missing countdown as proof that payment succeeded; check the payment state before asking the customer to pay again.
If the payment provider reports a successful payment for an order that is canceled, do not assume the booking is restored or ask the customer to pay again. Check the order and payment outcome using Check the payment step.
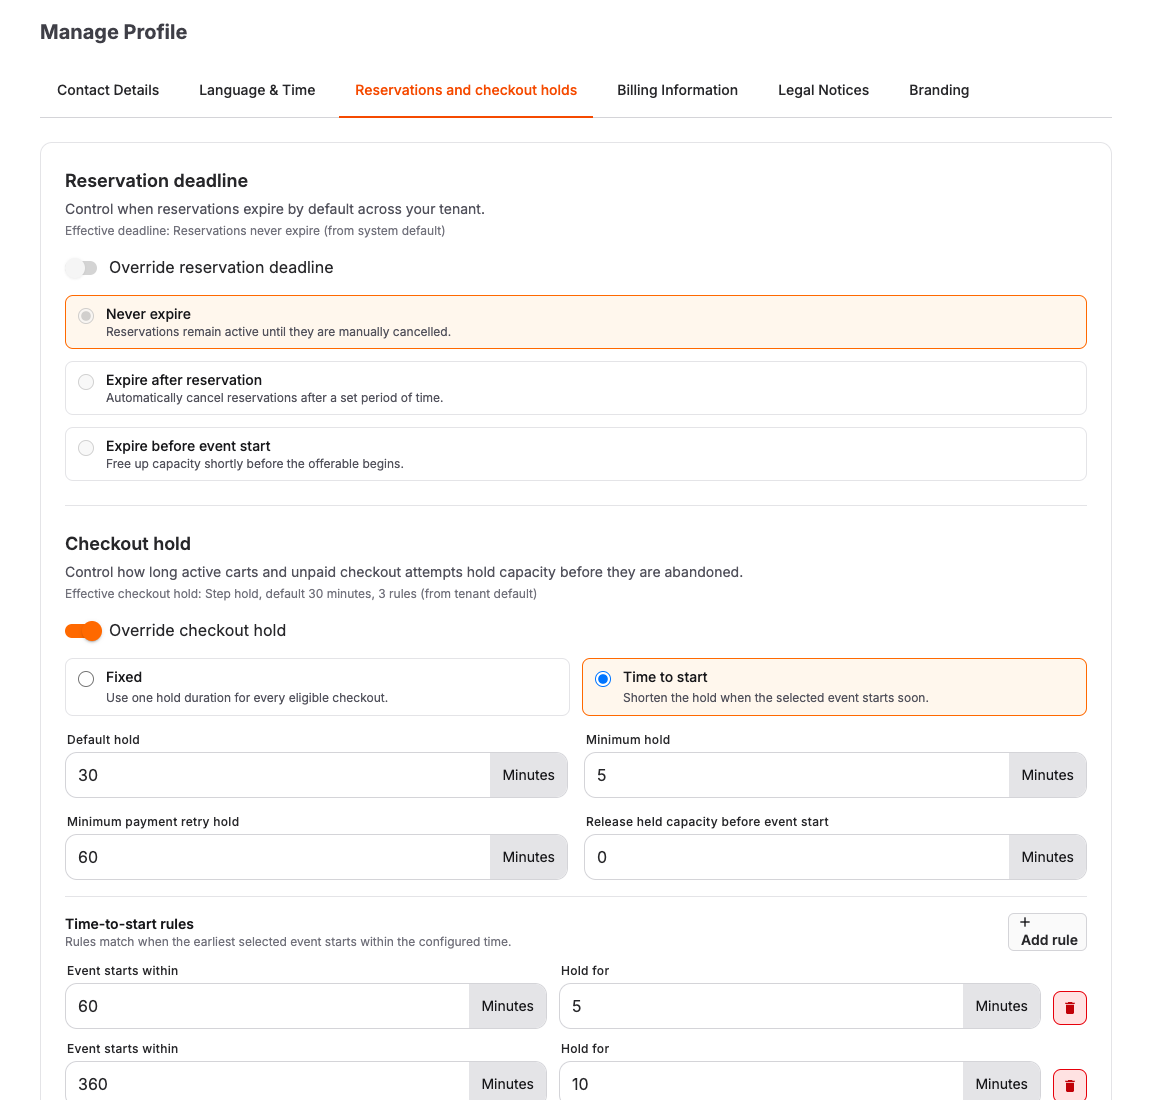
Set the account-wide checkout hold
- Open Admin > Account.
- Open Reservations and checkout holds.
- Find Checkout hold.
- Select Override checkout hold.
- Choose Fixed or Time to start.
- Enter each hold value using Hour(s) and Minute(s).
- Review Preview to confirm the resulting customer time for near-term and future events.
- Save the account settings.
Set an order-channel checkout hold
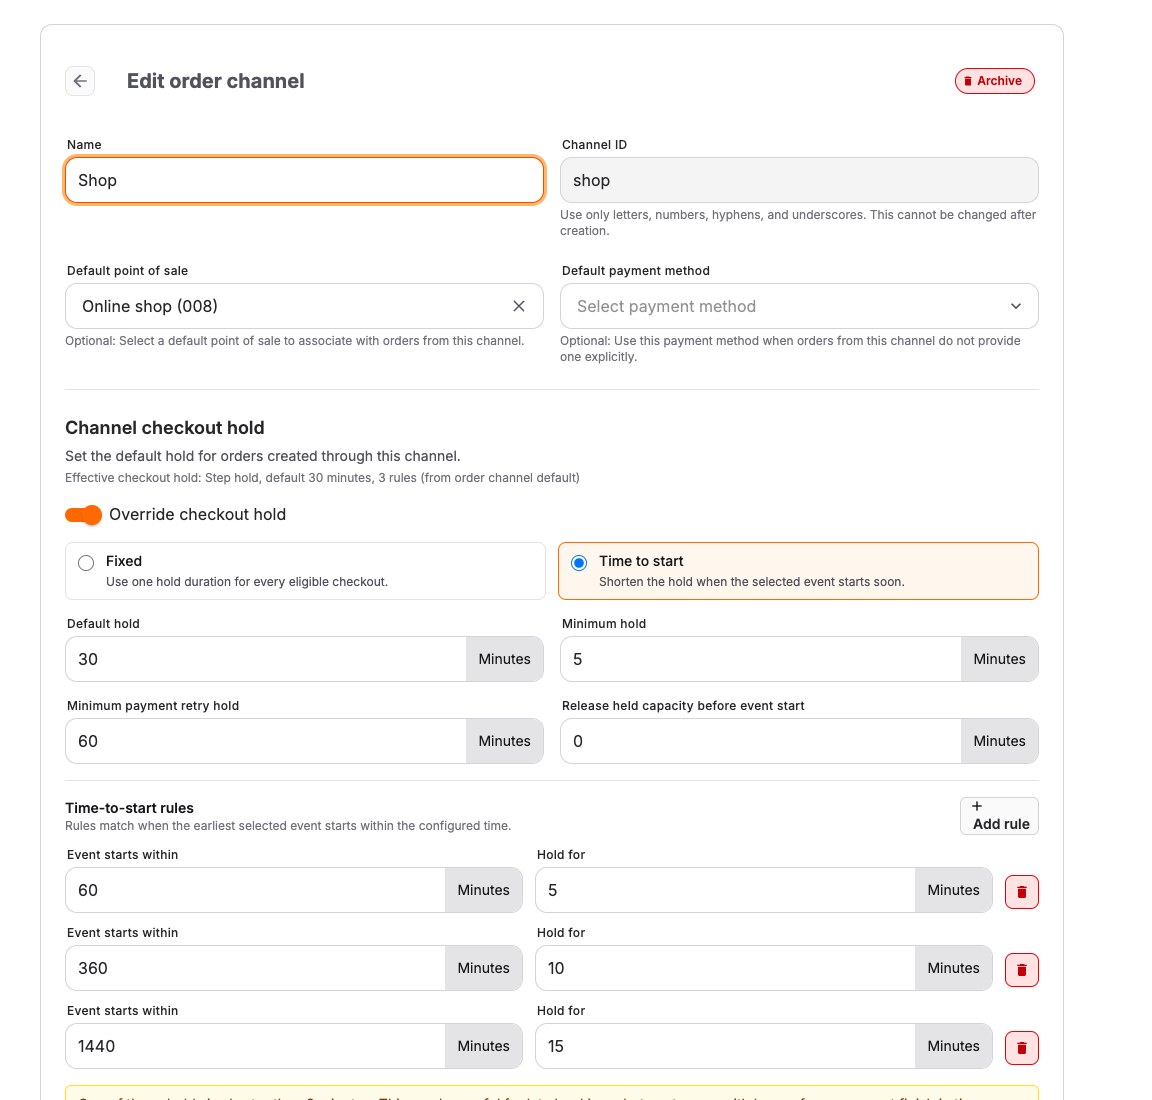
Use order-channel checkout holds when the online shop, POS, self-checkout, or back-office flow should use a different timeout.
- Open Settings > Order channels.
- Open the order channel.
- Find Channel checkout hold.
- Select Override checkout hold.
- Choose Fixed or Time to start.
- Enter the required values for the selected mode: duration or rules, Minimum hold, Minimum payment retry hold, and Release held capacity before event start.
- Save the order channel.
Override checkout holds for one offer
Use an offer override when one event, event template, or admission should behave differently from the channel default.
- Open Services > Events, Event templates, or Admissions.
- Open the offer and select Edit or the detail form.
- Find Checkout hold.
- Select Override checkout hold.
- Choose Fixed or Time to start.
- Enter the required values for the selected mode: duration or rules, Minimum hold, Minimum payment retry hold, and Release held capacity before event start.
- Save the offer.
Configure reservation deadlines
Reservation deadlines control how long an already reserved or unpaid order keeps capacity before staff follow up, cancel, or let it expire. They are separate from checkout holds, which happen before or during checkout.
Set the account-wide reservation default
Open Admin > Account and open Reservations and checkout holds. Use Reservation deadlines to define the default expiration for reservations across your account. This default applies whenever an offer or order does not set its own deadline.
Configure an offer reservation deadline
- Open Services > Events, Event templates, or Admissions.
- Open the offer and select Edit or the detail form.
- Find Reservation deadline.
- Choose the deadline rule, such as after reservation or before event start, where available.
- Enter the time amount.
- Save the offer.
Configure one order
Open the order and select Overview. Where available, use Reservation deadline to adjust the deadline for that order, then save.
Expected result
Active carts and eligible checkout attempts hold capacity only until their checkout-hold timer expires. Reserved or unpaid capacity is held until the configured reservation deadline, and staff can see the deadline on the order before deciding whether to extend, cancel, or follow up.
Troubleshooting
| Problem | What to check |
|---|---|
| Checkout hold fields are missing | Permissions, whether you are editing Admin > Account, an order channel, or an offer type that supports checkout holds, and whether an older account still needs defaults saved. |
| Countdown does not appear | Whether a checkout-hold policy is configured, whether the cart has active items, and whether the order is still eligible for a customer checkout hold. |
| Timer is shorter than expected | Offer override, order-channel default, account default, Time to start rules, Minimum hold, and Release held capacity before event start. |
| Capacity remains blocked | Order state, checkout-hold expiry, reservation deadline, whether expiration processing has run, and manual staff holds. |
| Customer paid after deadline | Check order state, payment state, capacity, and whether a new order was created. |
