Create a sellable event
Use an event when you are selling tickets for something with one fixed date, start time, and end time.
For repeated sessions, tours, rentals, or day tickets, use an event template or admission instead. Those setups share many of the same price, sales channel, and checkout checks, but the schedule is managed differently.
Before you start
Prepare:
- event name and customer-facing description
- date, Start time, and End time
- capacity and whether the event is exclusive
- price categories and synchronized KORONA.studio products with the correct customer prices
- products or included add-ons that should be sold with the event
- any point-of-sale restrictions, reserved allocations, or sales windows that differ from the default
- customer or attendee information that must be collected
- payment and invoice expectations
- resources such as staff, guides, rooms, vehicles, or equipment, if they limit availability
You need permission to create events, edit prices, update sales channels, and publish offers.
Open the event form
In the back office, open Services > Events.
Select Create event. The page title is Create new event.
Enter event details
If the event should copy setup from an existing template, use Create from a template (optional) and select the template. Review the copied values before saving because the template can bring over settings that are not visible in the first form, such as prices and sales channels.
Enter Name and select Add description for the customer-facing description.
If the account sells in more than one language, use the language controls to enter translated names and descriptions before publishing.
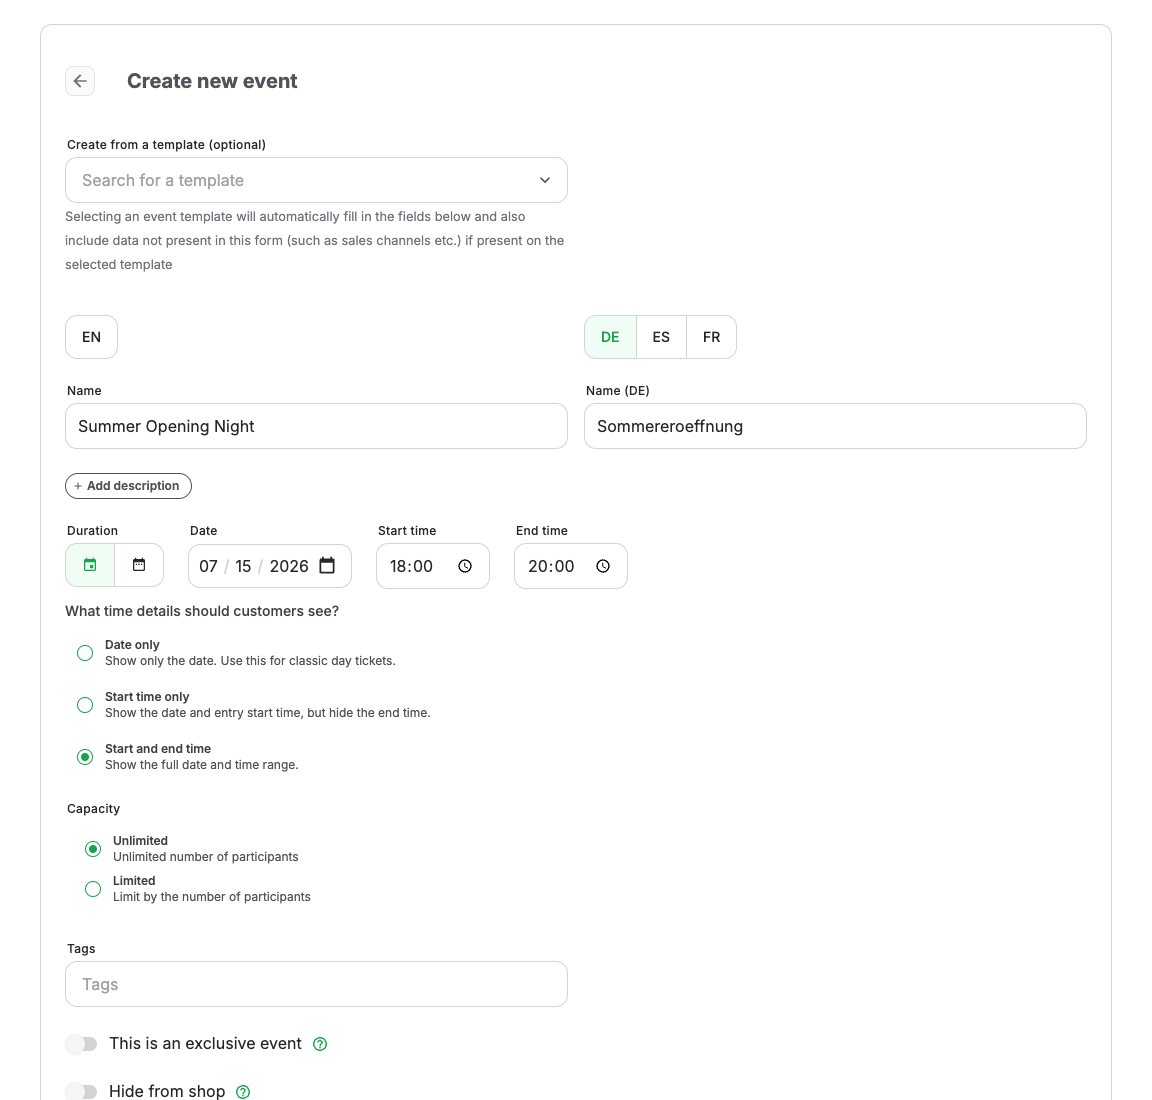
Set date and time
In Choose a date, select the event date. Enter Start time and End time.
Under What time details should customers see?, select the display mode:
| Option | Use it when |
|---|---|
| Date only | The offer works like a day ticket and the exact time should not be emphasized. |
| Start time only | Customers need the entry start time but not the end time. |
| Start and end time | The full time range matters for planning, admission, or ticket validity. |
Check the date, time, and account time zone carefully. The time affects shop display, tickets, attendee lists, resource planning, and reports.
Set capacity and visibility
In Capacity, choose the limit that matches operations:
| Option | Result |
|---|---|
| Unlimited | KORONA Event does not stop sales because of event capacity. Use only when operations can accept unlimited bookings. |
| Limited | KORONA Event tracks a maximum number of places for the event. |
Turn on This is an exclusive event only when one booking should block the whole event for everyone else.
Turn on Hide from shop when the event should not appear in online shop listings or search results. A hidden event may still be reachable by direct link, depending on setup, so do not use it as the only control for sensitive private events.
If the event has a different venue from the account default, clear Venue and address are the same as in my account and enter Venue and Address.
Choose whether Ticket is valid only for the exact duration of the event. If attendees may enter before or after the event start, use the entry validity controls to set the allowed window.
Select Create.
Add prices
Open the Prices tab and select Add pricing.
For each ticket type, enter:
| Field | What it controls |
|---|---|
| Price category | The customer-facing label, such as Adult, Child, Reduced, Group, or Member. |
| Product | What is sold for this price. Product setup can affect capacity, tickets, reporting, and POS behavior. |
| Visible on the following sales channels | Where this price can be selected. A price can be available in the online shop, POS, back office, or another channel. |
| Min quantity | The minimum number a customer or staff member must buy for this price row. |
| Max quantity | The maximum number allowed for this price row in one order. |
Review the capacity note beside each price. Ticket prices should normally reduce capacity. Add-ons should reduce capacity only when each selected add-on also consumes a place.
Free products for infants, toddlers, carers, or other participants must still reduce capacity when the person counts toward a physical or safety limit. Separately enable Represents an attendee when the product should create an attendee record.
Select Update prices.
Review sales-channel defaults
New events start with one rule covering all configured points of sale, with no additional channel-specific limit. Event capacity and required resources still limit total availability. Keep this default for normal sales; open Sales channels only to reserve capacity, restrict POSs, or set a sales period.
If you need a narrower rule, select Add sales channel and choose the POSs where it should apply.
For each sales channel rule, choose the quantity limit:
| Quantity limit | Use it when |
|---|---|
| Event capacity | This channel can use the event's remaining capacity. |
| Limited | This channel should have a reserved allocation. Enter Capacity. |
| Unlimited | This rule adds no channel-specific limit; event capacity and resources still apply. |
Use Sales start to choose how long before the event tickets become available. For Sales end, keep Until event end (default) or select Relative to event start and close sales before, at, or after the event starts. Use Custom... for an exact duration such as 30 minutes after the start.
Only the final sales period can stay open until the event ends or close after the event starts. Set an earlier period to end at or before the event start before adding another sales period.
Select Update sales channels.
Add required resources
If staff, rooms, equipment, vehicles, or another resource limits whether the event can run, open Required resources.
Select Add requirement. Use Search staff, roles, inventory, functions to find a resource or Role / Function. Enter Quantity when more than one resource is needed.
Use reservation offsets only when the resource must be held before the event starts, after it ends, or for only part of the event.
If resource limits reduce available event capacity, the event may show a capacity warning or capacity blockers. Resolve missing resources before you publish.
Publish the event
Publish the event only after the event details, prices, sales channels, capacity, resources, checkout policy, and customer communication are approved. Keep Hide from shop on when the event should remain available only through a direct link or staff channel.
Expected result
The event has the intended content, schedule, prices, capacity, resources, sales channels, checkout policy, and publishing state.
Check your work
The event is sellable when:
- the event is not archived
- the publishing state allows customers to see it at the right time
- Hide from shop is off unless you intentionally use direct links
- at least one active price exists for each intended sales channel
- sales channel capacity and sales periods allow the selected quantity
- remaining event or resource capacity is available
- the event is assigned to the intended shop and points of sale
Troubleshooting
For a missing event, follow Troubleshoot an offer missing from the shop.
| Problem | What to check |
|---|---|
| Event is not shown in the shop | Publishing state, Hide from shop, shop page, sales channel, sales period, active prices, inventory, and capacity. |
| Event appears but has no selectable tickets | Prices, Visible on the following sales channels, Min quantity, Max quantity, and whether price rules are active. |
| POS cannot sell the event | POS sales channel, event date, active POS-visible prices, POS number or channel setup, and remaining capacity. |
| Quantity cannot be selected | Capacity, resource limits, minimum and maximum quantities, and included product choices. |
| Event is sold out unexpectedly | Event capacity, sales channel allocation, resource capacity, existing booked and reserved orders, and price rules that reduce capacity. |
| Customer checkout stops after adding the event | Required checkout fields, waiver setup, legal documents, checkout policy, payment method, and mixed-cart warnings. |
