Configure the current online shop
- Availability
- Beta
- Last verified
- Last verified Jul 14, 2026
The online shop The customer-facing sales channel where customers browse offers, select tickets, enter checkout details, and complete payment or confirmation. is the customer-facing surface where people browse offers, select tickets, enter checkout details, and complete payment or confirmation.
Use this article when you are preparing a shop for launch or reviewing why customers cannot find or buy an offer.
Before you start
You need back-office The administrative area where staff create offers, manage orders, configure prices, assign resources, and review operational data. access to the Shops area and at least one offer that should be sold online.
Confirm:
- which shop domain customers will use
- which sales channel is assigned to the shop
- which events, admissions, products, or vouchers should appear
- which legal documents must be shown or accepted
- which payment methods are approved for the account
- whether the shop should be public or restricted during testing
Open Shops
In the back office, open Shops. If there is more than one shop, select the shop by Name, Domain name, and Sales channel.
Use the tabs in the shop settings to review the customer experience:
| Tab | What it controls |
|---|---|
| Branding | Logo, favicon, colors, fonts, and language switcher flags. |
| SEO | Search titles, descriptions, social sharing, organization identity, and indexing. |
| Pages | Standard shop pages for tickets, events, products, vouchers, and landing page banner. |
| Page Builder | Custom pages, page order, navigation visibility, and content blocks such as offer lists. |
| Checkout | Default booking flow, default payment method, customer fields, withdrawal flow, analytics, donations, footer, and navigation. |
| Calendar | Calendar display, remaining capacity display, price display, legend labels (translatable), and date styling. |
| Time Slots | Time selection display, remaining capacity display, price display, legend labels (translatable), and time-slot styling. |
| Code snippets | Custom CSS and HTML or JavaScript snippets such as consent manager or trusted-shop snippets. |
| Theme | Colors, typography, spacing, borders, contrast checks, and published theme state. |
Use the tab that owns the change you need:
| Customer-facing change | Edit it in |
|---|---|
| Logo, favicon, basic colors, or fonts | Branding |
| Search result or shared-link defaults | SEO |
| Standard event, product, or voucher page | Pages |
| Home page, navigation, text, images, or offer lists | Page Builder |
| Customer fields, payment default, or booking flow | Checkout |
| Customer date display | Calendar |
| Customer start-time display | Time Slots |
| Calendar or time-slot legend label translations | Calendar or Time Slots |
| Detailed visual design | Theme |
| Approved tracking or custom code | Code snippets |
For translated legend labels and other customer-facing shop text, see Change labels or translated shop content.
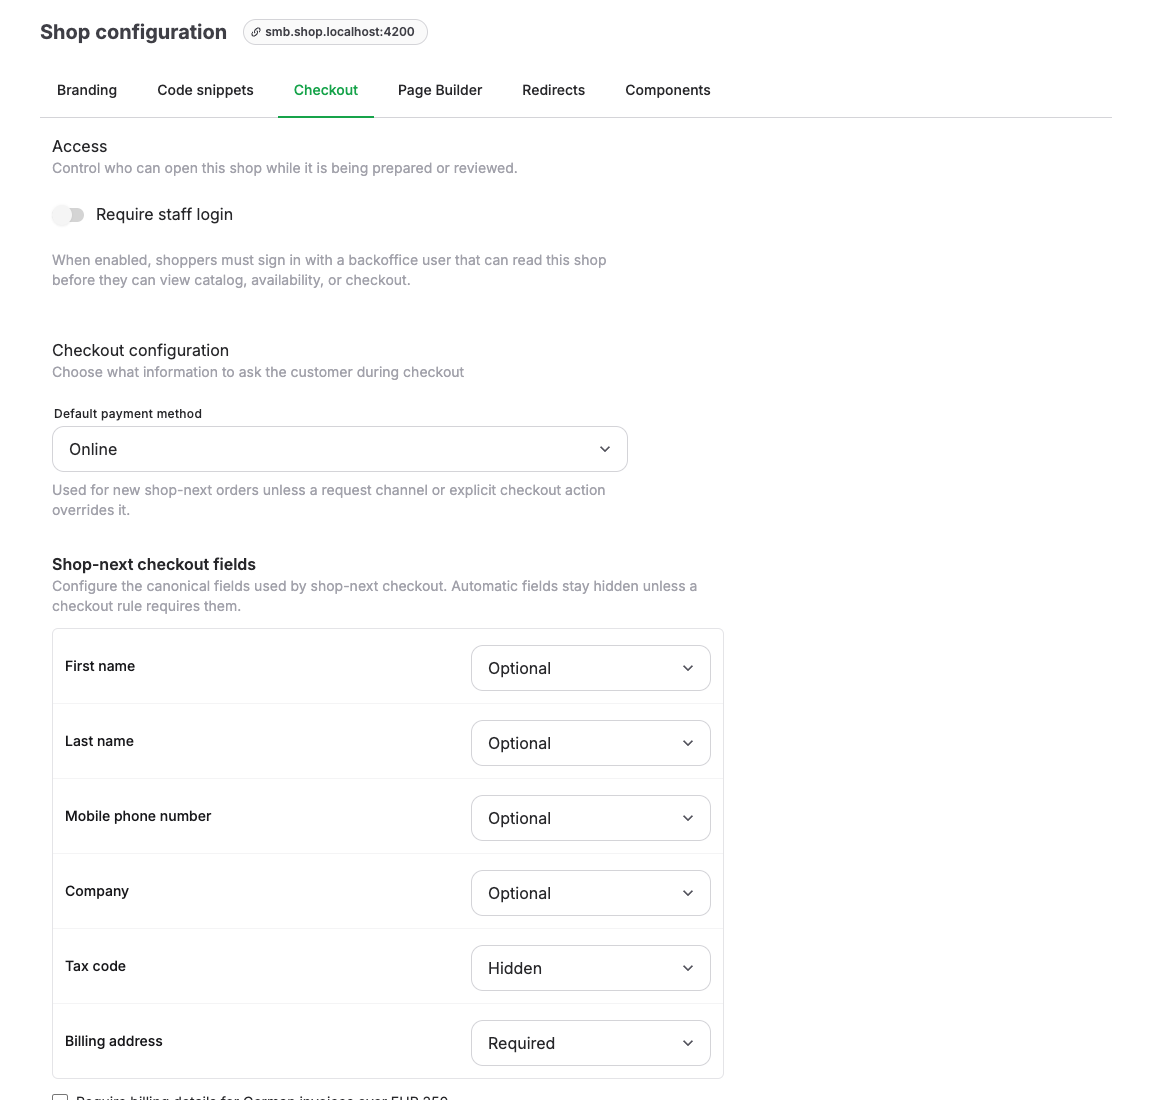
Set shop access
Use Access to decide who can open the shop.
Turn on Require staff login when the shop is still being prepared or reviewed. When this is enabled, shoppers must sign in with a back-office user that can read the shop before they can view catalog, availability, or checkout.
Turn it off before public launch unless the shop is intentionally staff-only.
Configure branding and theme
Open Branding and check:
- Logo
- Favicon
- Primary color
- Secondary color
- fonts
- Show flags in the language switcher
Open Theme when the shop needs more detailed control over Colors, Typography, Spacing, Borders, Button Colors, Semantic Colors, Media, and WCAG contrast checks.
If the theme editor shows unpublished changes, use the theme publish action only after you test the shop on desktop and mobile.
Open SEO to set the public site name, title template, default description and social image, organization identity, and search-engine indexing. Follow Configure search and social sharing for the fallback and indexing rules.
Configure pages and navigation
Open Pages and confirm which shop pages are active. Standard page types include Tickets, Events, Products, and Vouchers.
Use Activate this page to control whether a page is available. Use Display the filter bar underneath the page title when customers need filtering for larger catalogs.
Open Page Builder for custom pages and navigation. Check:
- page order in the page builder list
- whether important pages are Shown in navigation
- whether the home page contains an offer list or clear route to the first offer
- whether offer lists include the events, admissions, products, or vouchers customers need
- whether page titles, descriptions, and call-to-action labels are customer-friendly
For block types, offer-list filters, page ordering, navigation, and the legacy Pages fallback, follow Customize shop page content and ordering.
Configure checkout
Open Checkout and review Checkout configuration.
| Setting | What to check |
|---|---|
| Default booking flow | Choose whether dated offers start with Date/time first or Quantity first unless the offer overrides it. |
| Default payment method | Choose the payment method used for new shop orders unless a sales channel or explicit checkout action overrides it. |
| Checkout fields | Set configurable customer fields to Automatic, Hidden, Optional, or Required. |
| Shipping address | This field is always Automatic. It appears and becomes required only when the cart contains products that must be shipped. |
| Show withdrawal flow | Shows the withdrawal button in the shop footer and allows customers to open the withdrawal page. Disable it only when your legal setup supports hiding it. |
| Analytics | Choose Privacy-preserving, Consent-managed, or Disabled for booking analytics and e-commerce events. |
| Donations | Enable only when a configured product should appear as a cart donation section. |
| Footer | Confirm social links, inherited URLs, and legal link visibility. |
| Navigation | Configure header behavior, including Hide header when scrolling down. |
For an external analytics provider, tag manager, advertising platform, or cookie banner, follow Configure external analytics and consent. The analytics mode does not block code that you add under Code snippets.
Keep required checkout fields limited to information your team actually uses. Required fields can block checkout if customers do not understand why they are needed.
The billing address mode controls how the address appears during checkout:
- Automatic keeps the billing address hidden unless a checkout rule makes it required for the current cart.
- Optional shows a closed Add a billing address disclosure. The address fields appear only after the customer opens it.
- Required keeps the address fields open and requires the customer to complete them.
- Hidden keeps the billing address out of checkout unless an active checkout rule makes it required for the current cart.
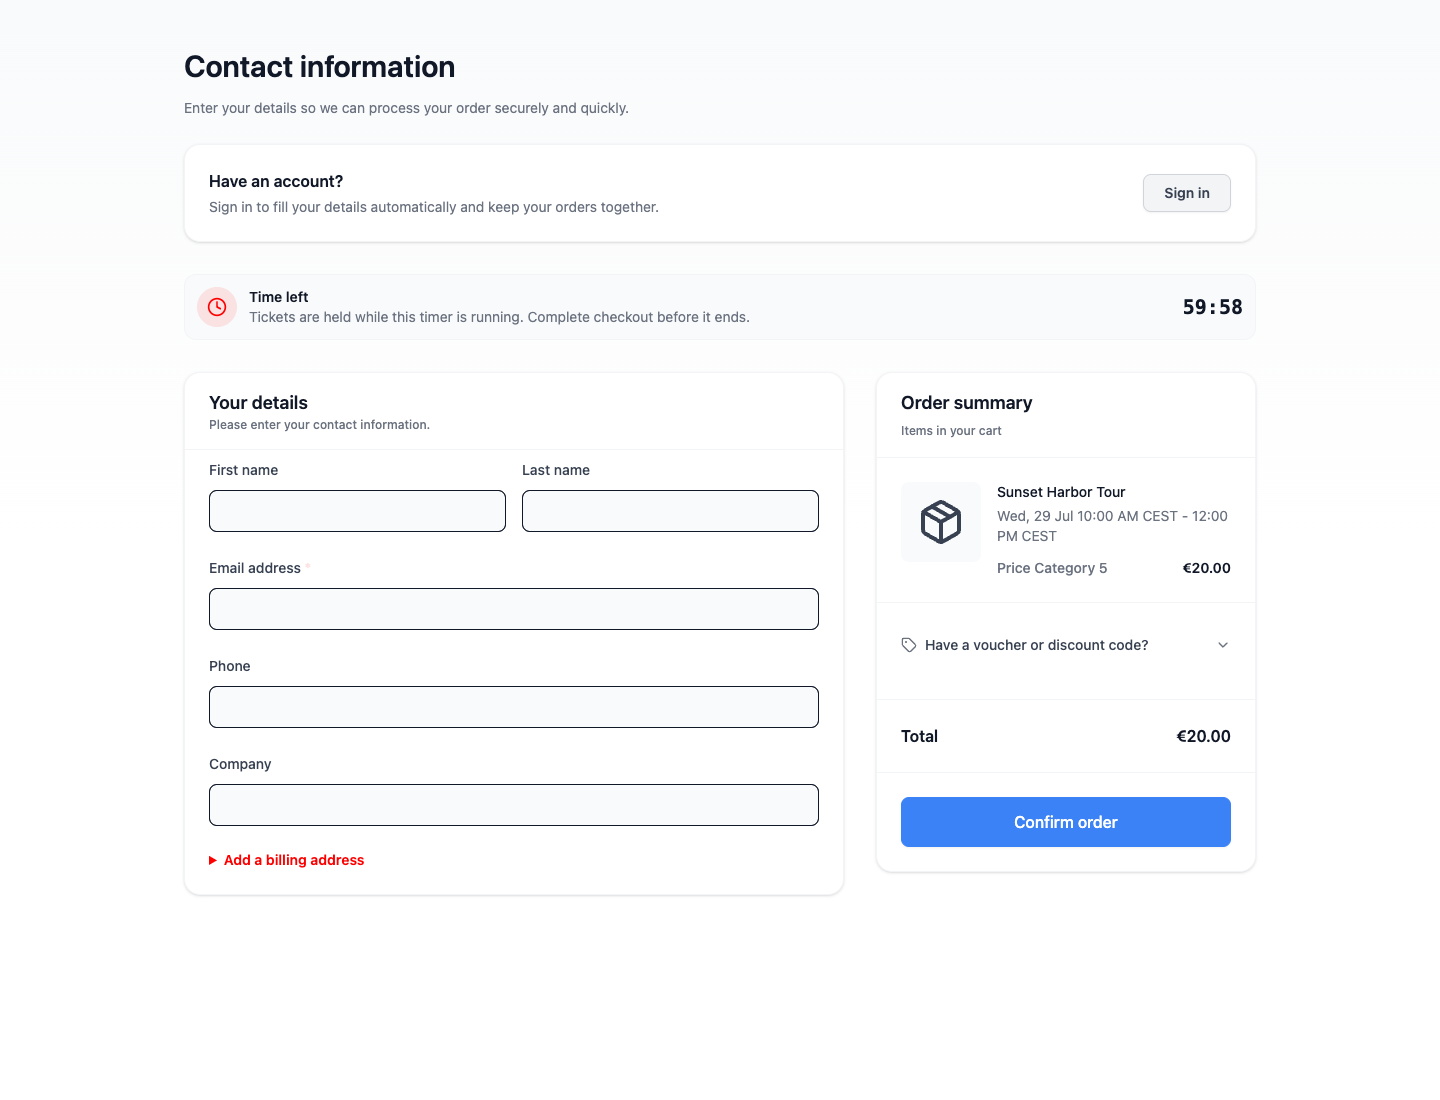
The shipping address is not an optional checkout setting. KORONA Event collects it automatically whenever delivery is required:
- If the billing address is visible, including when a checkout rule makes Automatic visible for this cart, the customer can use it as the shipping address or enter a different shipping address.
- If the billing address remains hidden because Automatic does not require it for this cart, or because Hidden is selected, checkout shows a separate required Shipping address section.
- If the cart does not contain products that must be shipped, checkout does not show shipping address fields.
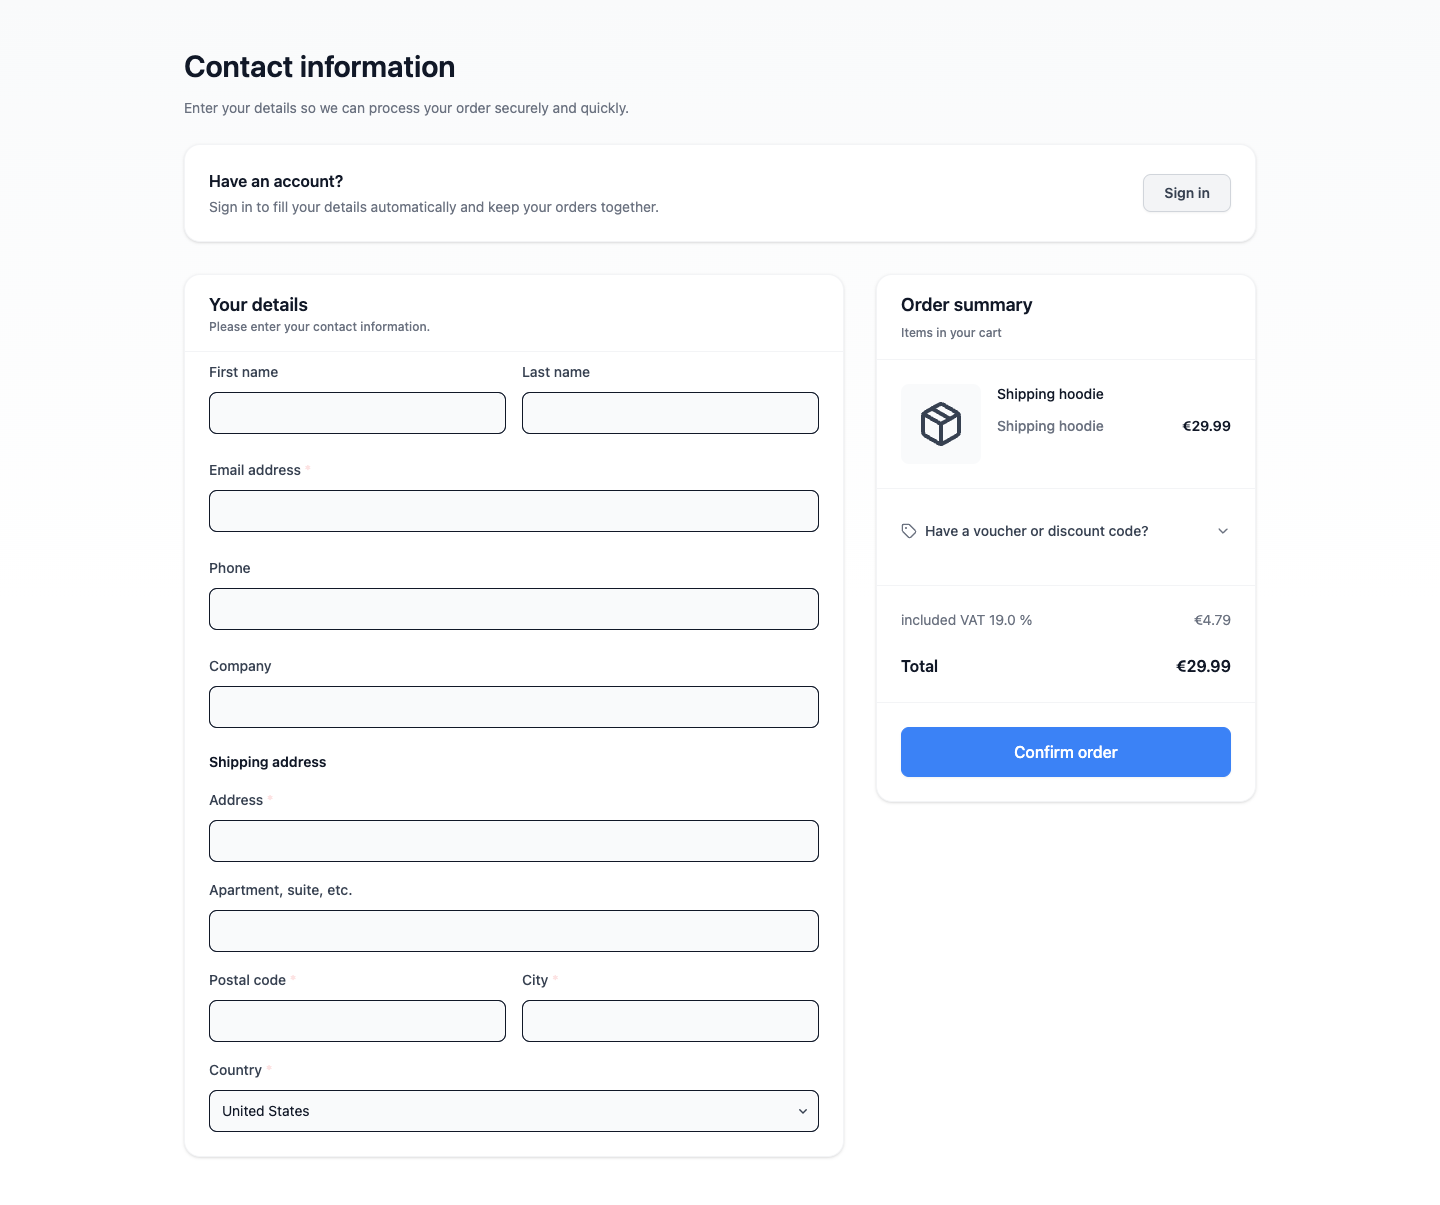
Choose the checkout result
For choosing a workflow and handling the next steps, see Manage booking requests and reservations.
A checkout policy A setting that controls the result and payment handling when a customer submits checkout for an offer. controls two independent choices: Checkout result determines whether the customer submits a request, reserves unpaid, or books; Payment method determines how payment is handled. A checkout hold instead controls how long an active cart or eligible unpaid checkout keeps capacity.
Checkout policies
Checkout policy controls the operational result created when a customer submits the cart.
| Option | What it does | When to use it | Watch out for |
|---|---|---|---|
| Request only | Creates an order in the requested state for staff review instead of confirming a booking. | Use it when staff must review availability or another condition before accepting the order. | A requested order is not a confirmed booking. |
| Reserve unpaid | Creates a reservation that holds capacity until its deadline or next action. | Use it when customers should hold places before payment or staff confirmation. | The reservation can expire; check its deadline before promising that capacity remains held. |
| Book and continue to payment | Books the order and continues into the configured payment flow. | Use it for normal checkout where the booking is created before or alongside payment. | Booked is an operational state and does not by itself prove that payment succeeded. |
Set a checkout policy on an offer
You need permission to edit the offer. Decide whether staff must review it before booking and how payment should be collected.
- Open Services and select Events, Event templates, Admissions, Products, or Vouchers.
- Open the offer's edit form. For products and vouchers, open Online display.
- Find Checkout policy.
- Set Checkout result to Request only, Reserve unpaid, or Book and continue to payment, using the choices above. Select Inherit default to remove this field's override.
- Set Payment method using the table below, or select Inherit default to keep the inherited payment handling.
- Save the offer.
Checkout payment methods
Payment handling assigned by an offer checkout policy; separate from the checkout result.
| Option | What it does | When to use it | Watch out for |
|---|---|---|---|
| Online payment | Uses the configured online payment provider. | When customers should pay online. | This selects online payment handling, not a specific card or wallet. |
| On-site payment | Assigns payment at the venue. | When staff collect payment at the venue. | Booking is not proof of payment. |
| Invoice | Uses invoice payment handling. | When your team collects payment by invoice. | Requires an established invoice collection process. |
| Collective invoice | Uses collective-invoice handling. | When orders should be included in collective invoicing. | Requires an established collective-invoicing process. |
| Delivery note | Uses the delivery-note workflow. | When delivery-note handling is enabled for the account. | Cannot be saved when the feature is unavailable. |
Choose invoice, collective-invoice, or delivery-note handling only when your team has the corresponding collection process. Book and continue to payment does not force an online payment when a different payment method is selected, and Booked does not mean Paid. Request only and Reserve unpaid submit without collecting payment immediately; the selected payment method still applies to the order.
For example, choose Reserve unpaid with On-site payment when customers should reserve places and pay at the venue. Set the reservation deadline to match how long those places should remain reserved.
Understand inherited settings
Inherit default applies separately to each field. You can override the checkout result while inheriting the payment method, or the other way around.
- An event uses its own explicit value first, then the value on its event template.
- An event template uses its own value first, then its direct parent template's value, if present.
- Admissions, products, and vouchers use their own explicit values.
- If no offer or template value sets the checkout result, the shop default applies; the system fallback is Book and continue to payment.
- If no offer or template value sets the payment method, an already assigned order payment method takes precedence, followed by the order-channel default and the shop's Default payment method under Shops > your shop > Checkout. Changing the shop default does not replace an explicit offer override or an already assigned order payment method.
For an event that should follow its template again, select Inherit default for the relevant field on the event. To use the shop or channel fallback, also remove any relevant explicit template value. Changing a shared template or default can affect other offers that inherit it.
Keep mixed carts compatible
All items in one shop cart must resolve to the same Checkout result and Payment method. Different checkout-hold durations are allowed; they do not by themselves create a checkout-policy conflict.
For example, an offer set to Request only cannot share checkout with an offer set to Book and continue to payment. Two booked offers also conflict if one requires Online payment and the other On-site payment.
If these differences are intentional, customers need separate orders. If the offers should be bought together, align the relevant offer or template settings, including inherited values. See Resolve incompatible cart items for the recovery steps.
Add legal documents
Open the account legal notice area when you need terms, privacy, imprint, withdrawal instructions, accessibility statements, or other legal documents.
For each legal document, confirm:
- customer-facing Name
- whether it is Required to accept at checkout
- Checkbox label
- language variants
- whether the document is shown as text in the shop or linked by URL
Confirm offer visibility
An offer appears in the shop only when its own setup and the shop setup agree.
Check the offer first:
- it is not archived
- it is published at the right time
- the Hide from shop setting is not unintentionally turned on
- it has future availability or an active sellable state
- it has at least one active price
- the price is visible on the shop's sales channel
- capacity and resources allow the selected quantity
Then check the shop:
- the shop has the right Sales channel
- the relevant standard page is active or the custom page contains the offer
- the page builder offer list or navigation lets customers find it
- search and category/filter settings match how customers will browse
Open the customer booking flow with a realistic ticket quantity and price selection. The calendar and time-slot picker recalculate availability for that selection, so a date can be unavailable even when the offer itself is visible.
Add snippets only when needed
Use Code snippets for controlled customizations such as consent managers, analytics tags, trusted-shop badges, small custom CSS adjustments, or partner scripts.
Use Add custom CSS for styling changes that cannot be handled by theme settings. Use Add HTML/JavaScript snippet only when the script is approved and tested.
Expected result
The shop has the intended access, domain, languages, branding, pages, offer lists, checkout fields, legal documents, payment choices, and customer-facing content.
Review customer-facing content
Review the content and policy choices your team controls:
- the domain loads without requiring staff login, unless the shop is intentionally restricted
- logo, colors, fonts, and language controls look correct
- navigation and pages lead customers to the right offers
- offer cards show the expected name, image, price, date, availability, and status
- offer cards and detail pages show prices in the account's configured currency
- required checkout fields and legal agreements are clear
- a merchandise order shows a required shipping address, either with the visible billing address or as standalone fields when billing remains hidden
- intended live payment methods are configured
Troubleshooting
| Problem | What to check |
|---|---|
| Customers cannot open the shop | Domain, shop deployment, Require staff login, and whether the customer is using the intended shop URL. |
| An event or product is missing | Offer publishing, Hide from shop, sales channel, active prices, capacity, page builder offer lists, page activation, and filters. |
| A price uses the wrong currency | The account and KORONA.studio currency settings, the synchronized product price, and whether a recent synchronization completed successfully. |
| A category or filter is missing | Pages, page builder configuration, offer tags/categories, and whether enough matching offers are active. |
| Checkout asks for too much information | Checkout configuration, checkout fields, event questions, attendee questions, waiver setup, and required legal documents. |
| A shipping address is not shown | Confirm the cart contains an active merchandise or shipping-required product. Shipping fields stay hidden for carts that do not need delivery. |
| Payment methods differ from expectations | Default payment method, offer checkout policy, payment provider setup, payment-link behavior, and payment method eligibility. |
| Tracking or snippets do not run | Analytics mode, consent manager behavior, snippet placement, browser consent state, and whether checkout pages allow the script. |
| Mobile layout looks wrong | Theme, custom CSS snippets, image ratios, page builder blocks, and long text labels. |
Related articles
- First event setup checklist
- Create a sellable event
- How sales channels and visibility work
- Review the customer checkout before launch
- How capacity and availability work
- Troubleshoot availability and capacity
- Customize shop page content and ordering
- Configure search and social sharing
- Change shop labels and translations
- Customize theme and CSS
- Configure external analytics and consent
